
Overview
AirgapAI connects your laptop to an AI server your organization runs on-premises, allowing you to chat and work with server-side models instead of only those on your machine. Once connected, the app sends your requests through a small local proxy on your laptop, which forwards them to the server over your network or a secure tunnel. Setting this up is straightforward: you choose how your laptop will reach the server, enter a few connection details, and connect. If the server resides on a private network and you're working remotely, you may need to set up a VPN first. This guide walks you through selecting your connection method, connecting to your network if needed, managing the Server Connection, and using the server models in the app.
In this guide
| Section | What you'll do |
|---|---|
| Setup | Overview — what this covers and how the guide is organized · Plan your connection — method, VPN decision, common setups |
| Connecting to VPN | Connect to VPN (only if needed) — get on the company network before reaching the server |
| Connecting to Server | Open Server Connection and the connection wizard — point AirgapAI at your server and connect |
| Using AirgapAI | Use the app — set your model, send a chat, run a Blockify job, reconnect your server |
| References | References — help, FAQ, and troubleshooting |
Before you begin
Open Settings and confirm you see a Server Connection tab. If it's missing, contact Iternal before continuing.
Plan Your Connection
Before you open the Server Connection, decide how your laptop will reach the server, whether you need a VPN first, and what information to have ready.
Which method do I use?
How were you told to reach the server — a web address, or a login?
Common setups
Find the situation that sounds most like yours.
You're off-site and IT gave you SSH login — server address, username, and password.
You're in the office but IT gave you SSH credentials instead of a direct web address.
You're off-site; IT gave you a web address and said the API is reachable after VPN.
You're on office or managed work Wi‑Fi and have the server's web address.
Do I need a VPN first?
A VPN lets your laptop join the server's private network. This applies to both connection methods — if your contact says the server is only reachable on the VPN or on the private network, connect the VPN before continuing. Use the table below to decide:
| Need VPN | No VPN Needed |
|---|---|
| Working remotely from home | On your office or work network (in the building, or on managed Wi-Fi) |
| Accessing from public Wi-Fi or outside company | Already connected to the company network |
| Your contact told you to use a VPN | Specifically told "No VPN needed" |
If you're not sure, ask your contact: "Do I need the VPN on to reach this server?"
Connect to VPN
If your laptop isn't already on the company's private network, connect your VPN or secure-access agent before opening Server Connection in AirgapAI. This applies to both connection methods — Direct endpoint and Managed SSH tunnel. Not sure if you need this step? See Do I need a VPN first?. Already on the network? Skip to Server Connection.
Your organization will use one of these — your contact will tell you which:
The steps below walk through the most common setup: OpenVPN Connect (shown here on version 3.9). If your organization uses a different VPN client, the process is the same — connect it, confirm it's active, then continue.
1. Install OpenVPN Connect and import your profile
Go to OpenVPN Connect and download the installer for your operating system. Open and install the applciation (click Agree if prompted).
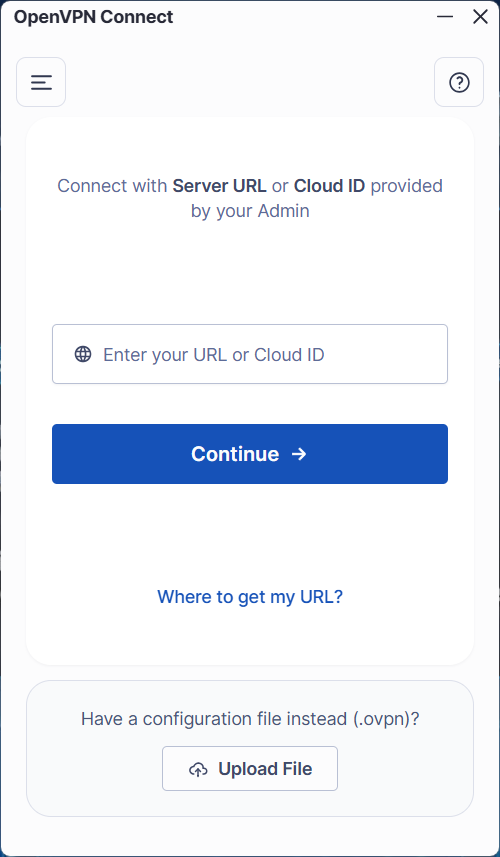
On the main screen, you have two ways to connect:
Server URL or Cloud ID: Enter the value provided by your organization into the relevant field, then follow the prompts to authenticate and connect.
Configuration file (.ovpn):
If you have a.ovpnconfiguration file (common for lab or pre-configured profiles):- Scroll to the bottom and look for "Have a configuration file instead (.ovpn)?".
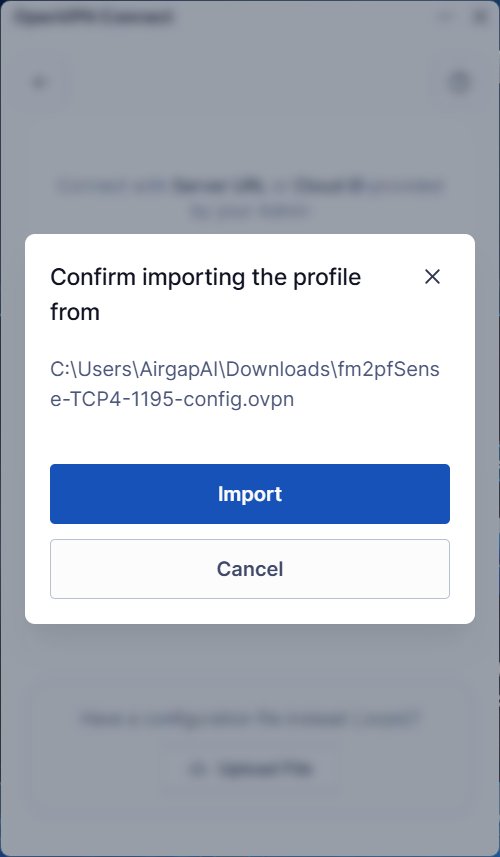
- Click Upload File.
- Select the
.ovpnprofile your contact gave you (Plan your connection).
2. Add your username and password to the profile
The lab profile signs in with a username and password, so put them on the profile first:
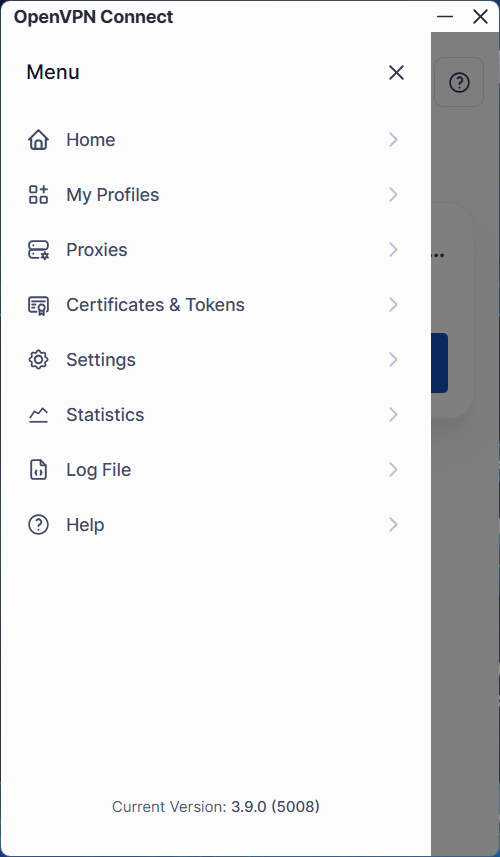
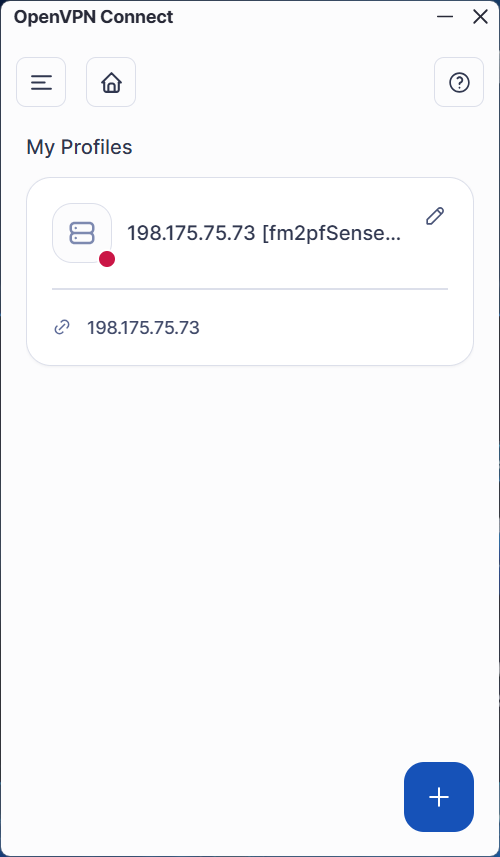
- Open the menu (☰), top-left, and choose My Profiles.
- On My Profiles, click the pencil (edit) icon on your profile.
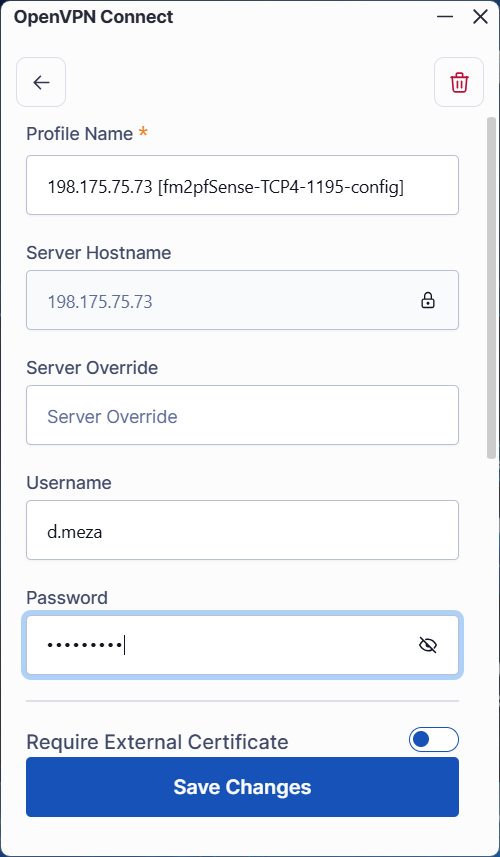
- On the Edit Profile screen, type your Username and Password (from Plan your connection). The eye icon reveals the password so you can check it. (Leave Server Hostname and Server Override as they are.)
- Disable Require External Certificate unless your contact specifically gave you a certificate.
- Click Save Changes.
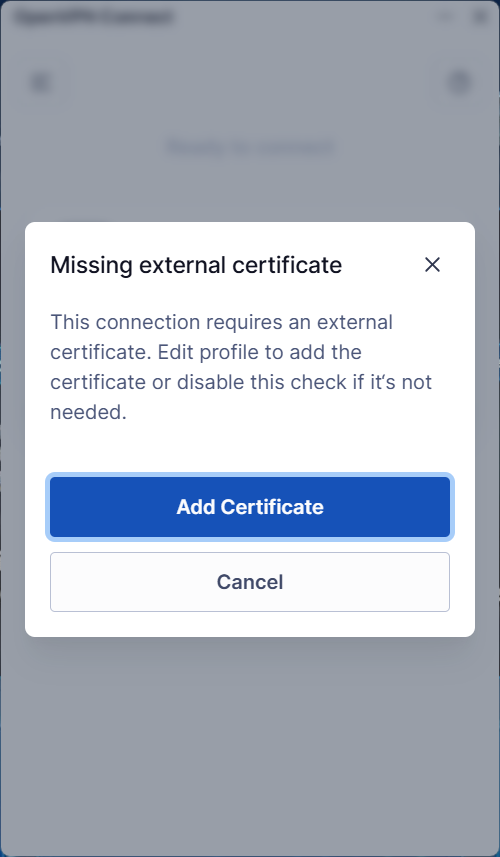
If you see "This connection requires an external certificate. Edit profile to add the certificate or disable this check if it's not needed.", your profile's certificate check is on but you don't have one. Click Cancel, return to Edit profile (above), and turn Require External Certificate off. _(Click Add Certificate only if your contact provided one.)_
3. Connect and confirm
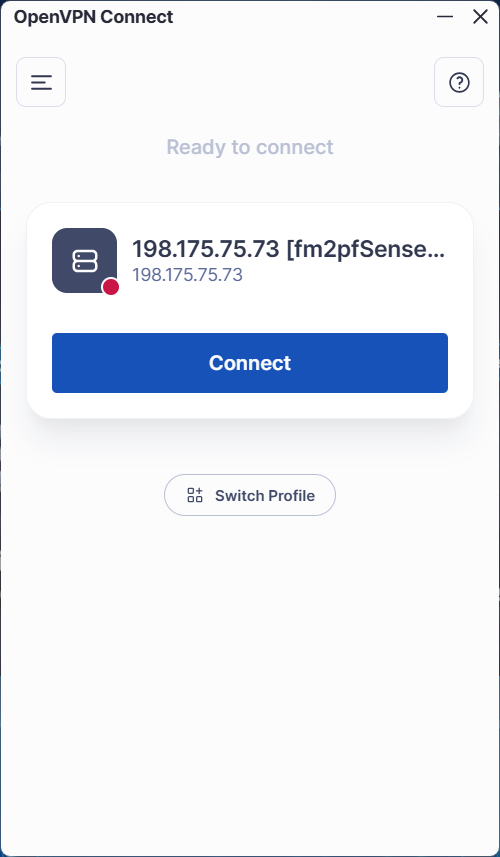
- Back on Home, click Connect.
- When the banner reads "Securely Connected!", the dot turns green, and the timer counts up, you're on the network. ✅
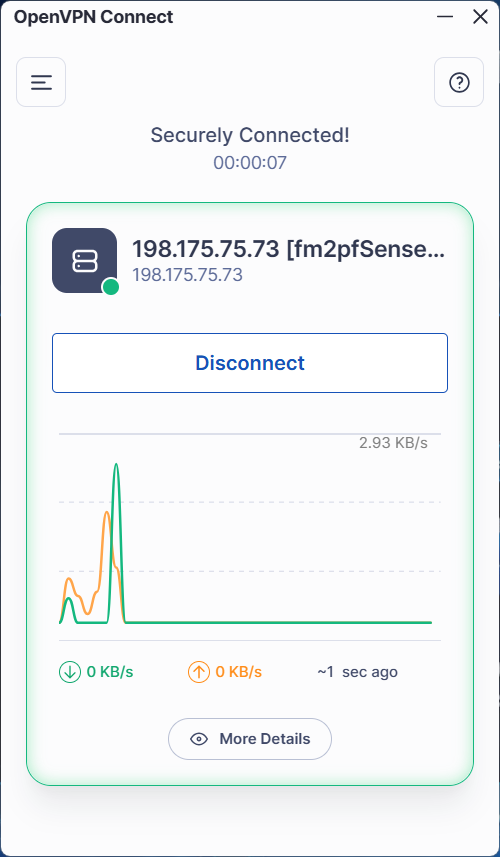
Leave the VPN connected for the rest of this guide and whenever you use the server. To disconnect later, open the profile and click Disconnect.
- "Authentication failed" — re-check the VPN username and password (trailing spaces, Caps Lock).
- "Cannot resolve / timed out" — confirm you have normal internet, then retry. If it persists, contact your contact or Iternal.
Connect to Your Server
In this section you connect your device to your organization's private AI model server. When you use server-side models, AirgapAI routes model traffic through a secure local proxy on your laptop. You enter how to reach the server (direct web address or SSH login) and the app configures that proxy automatically when you connect.
- If you needed a VPN, confirm it is green/connected before you start — see Connecting to VPN.
- If you're unsure which connection type to use, or need more information, see Plan your connection before proceeding.
1. Open Settings and the Server Connection tab
- On the home screen, navigate to the left navbar and select Settings in the bottom-left.
- In Settings, click the Server Connection tab in the row across the top.
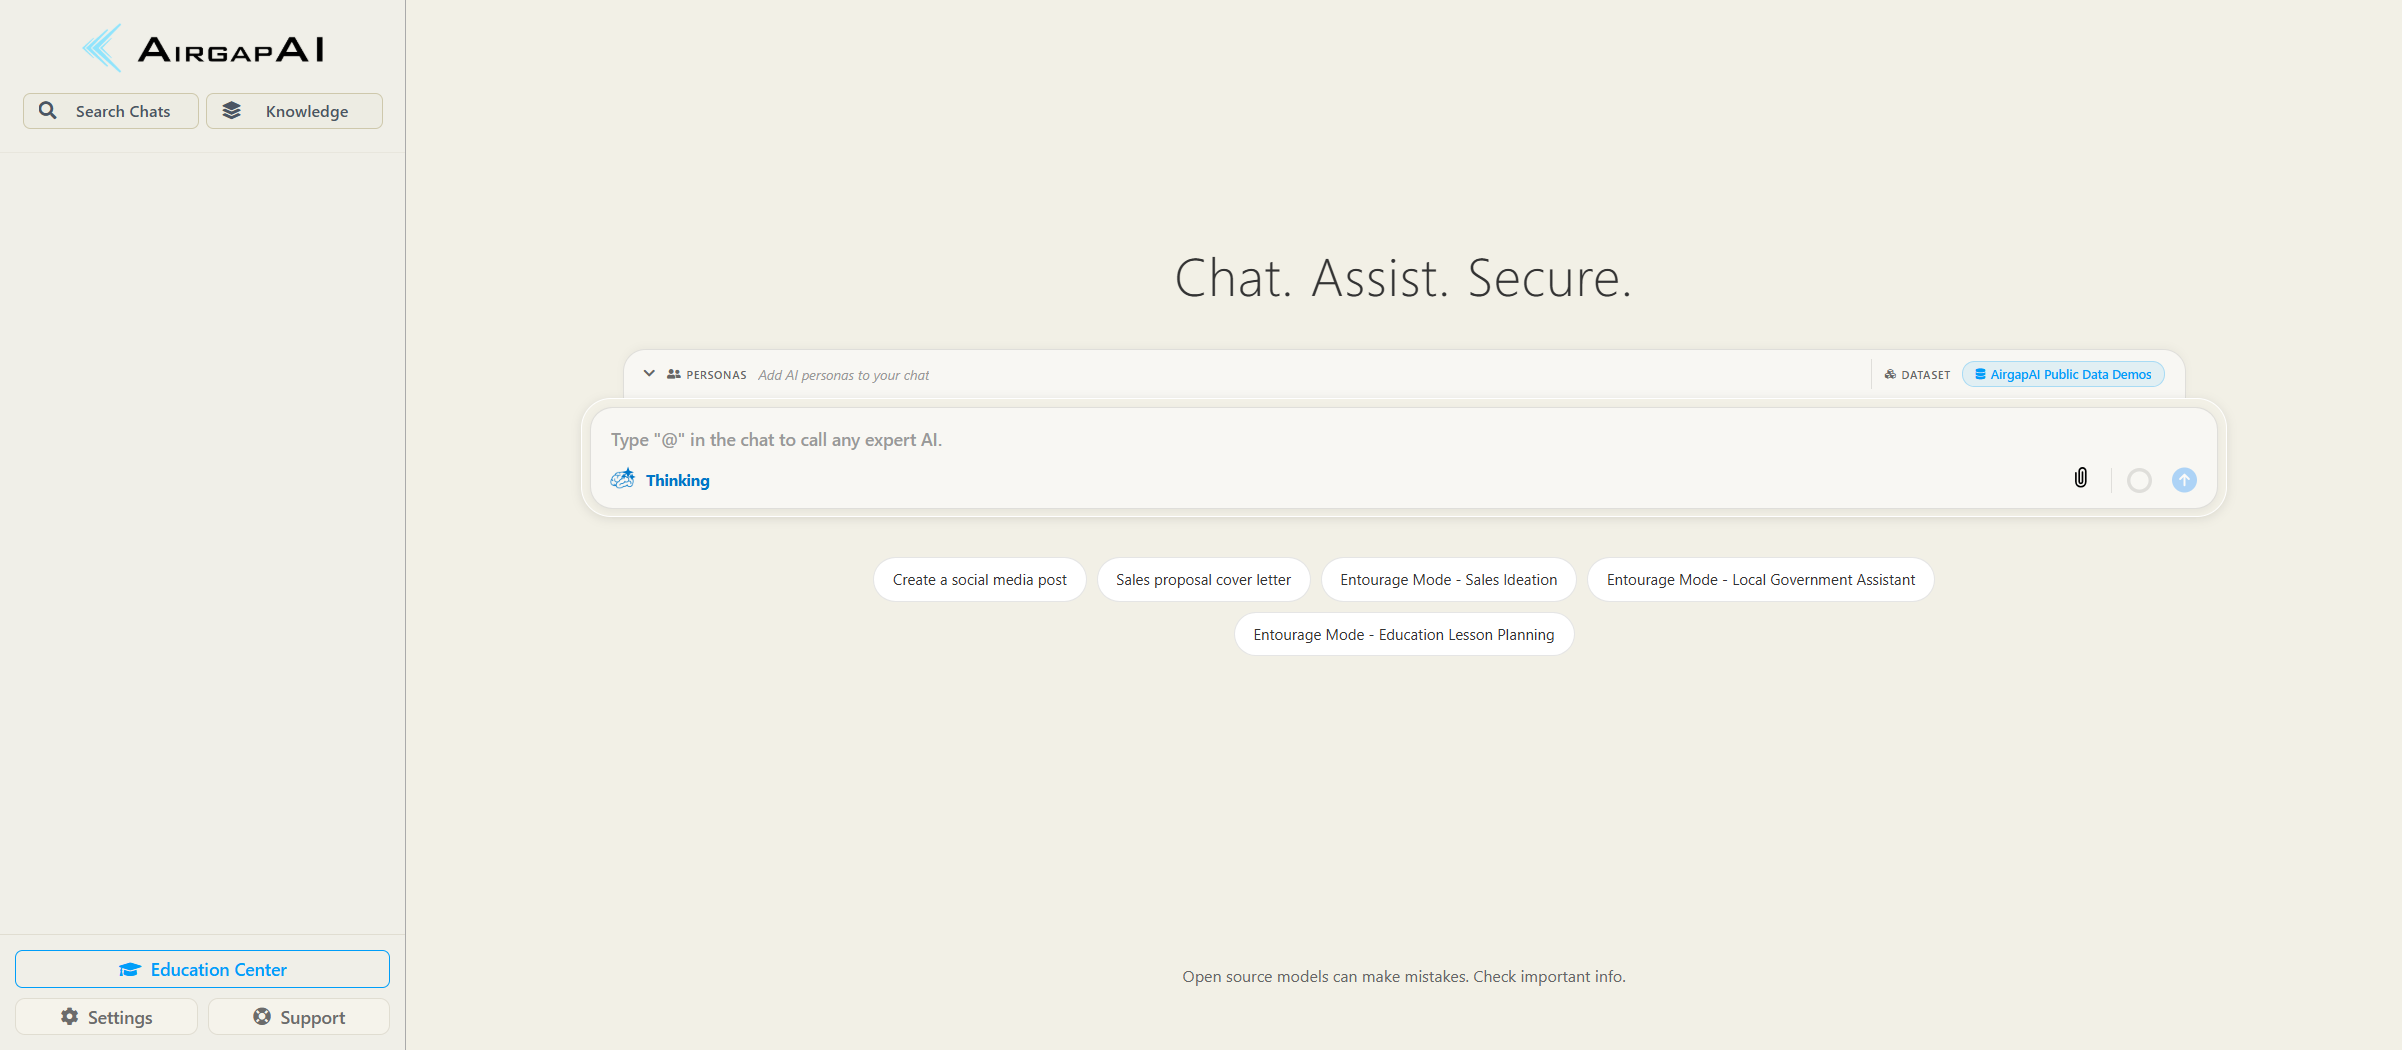
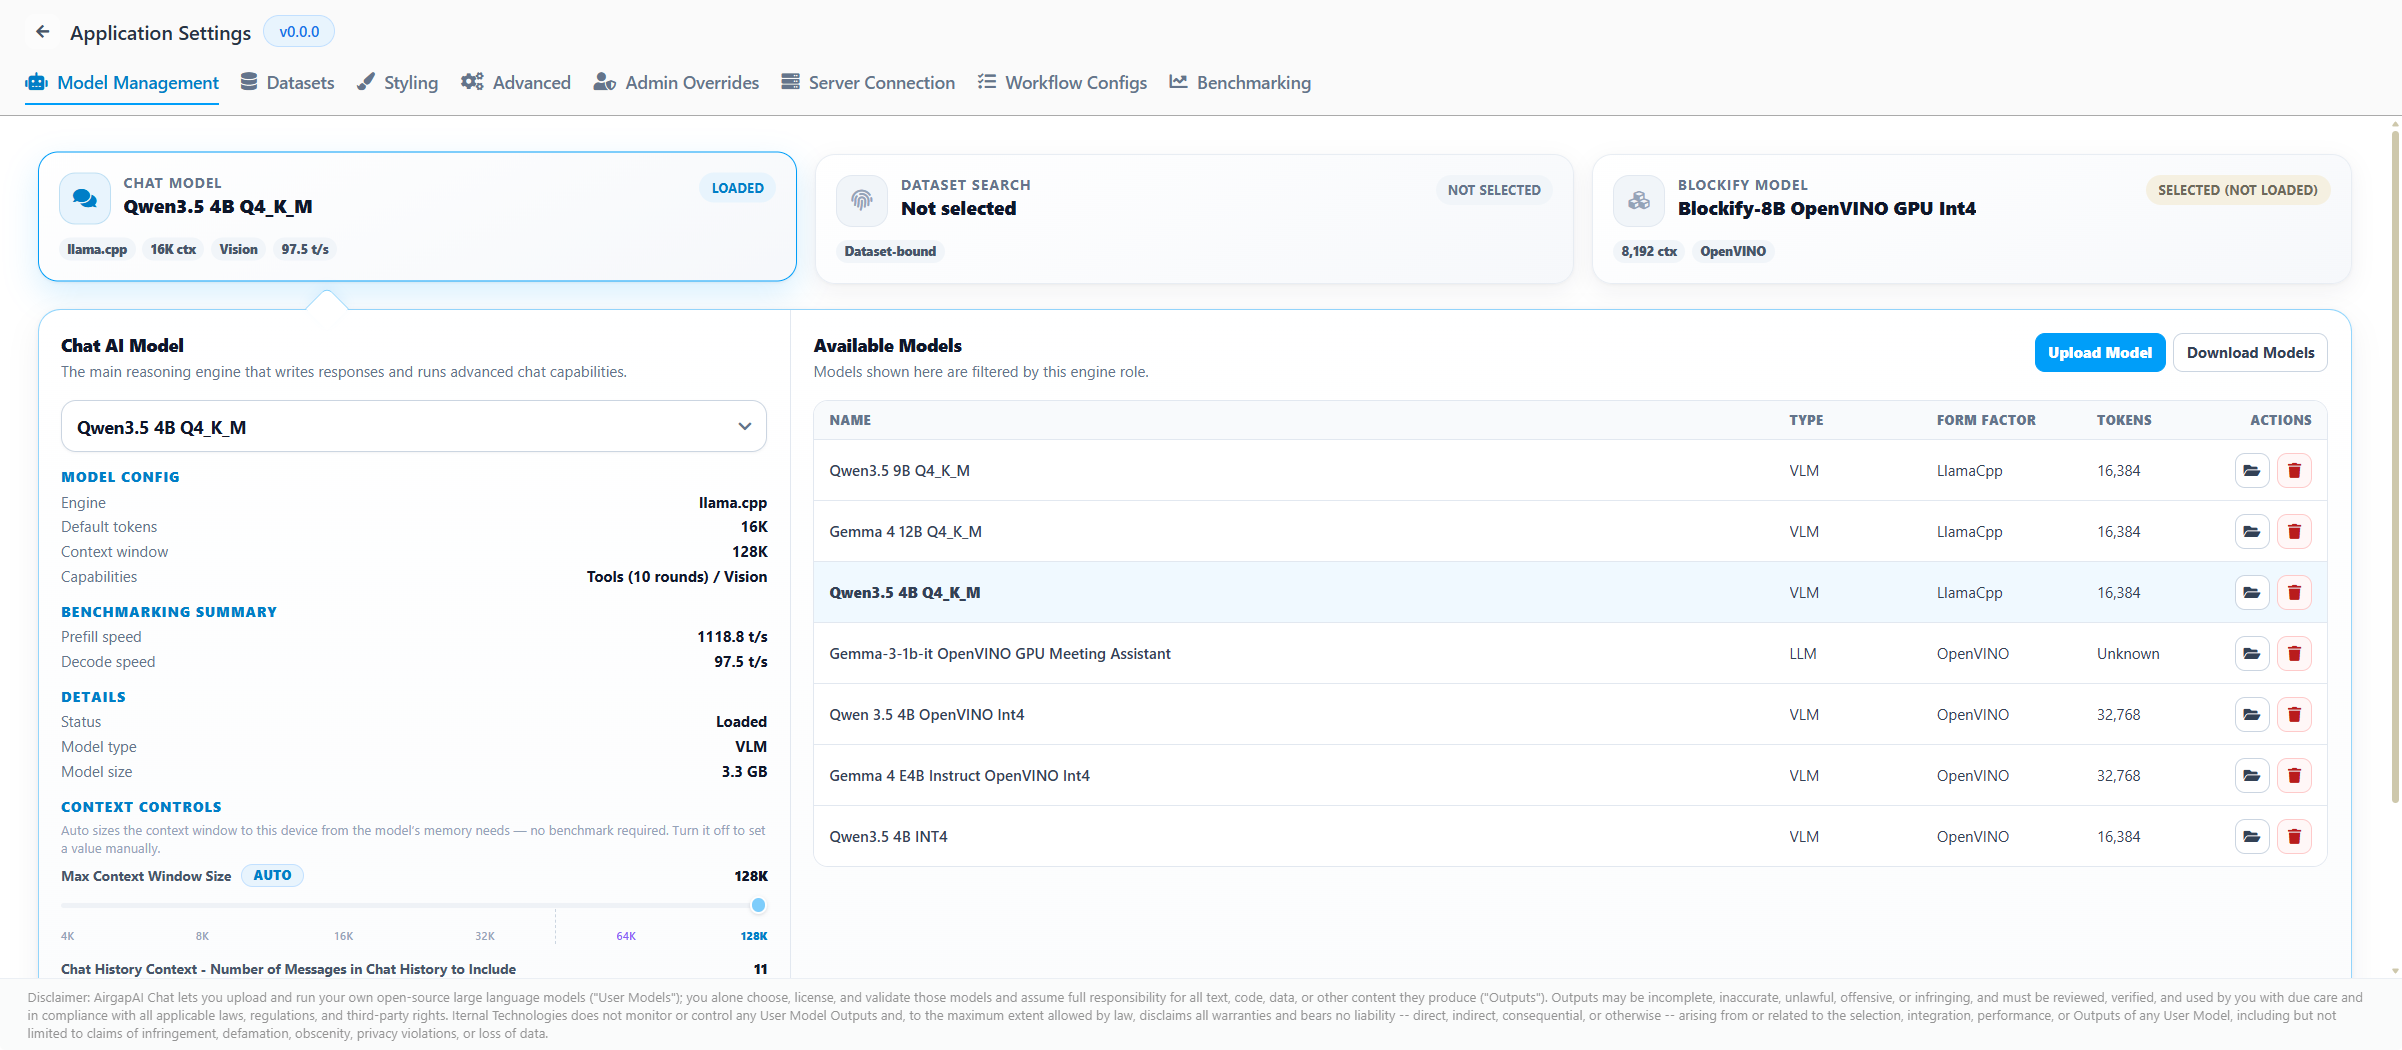
✅ Seeing the Server Connection tab confirms your build supports this. If it is missing, contact Iternal — see Before you begin.
2. Start a new connection
- On the erver Connection tab, read the short "Connect to your server" explainer on the left.
- On the right, under "Your connections," click New connection.
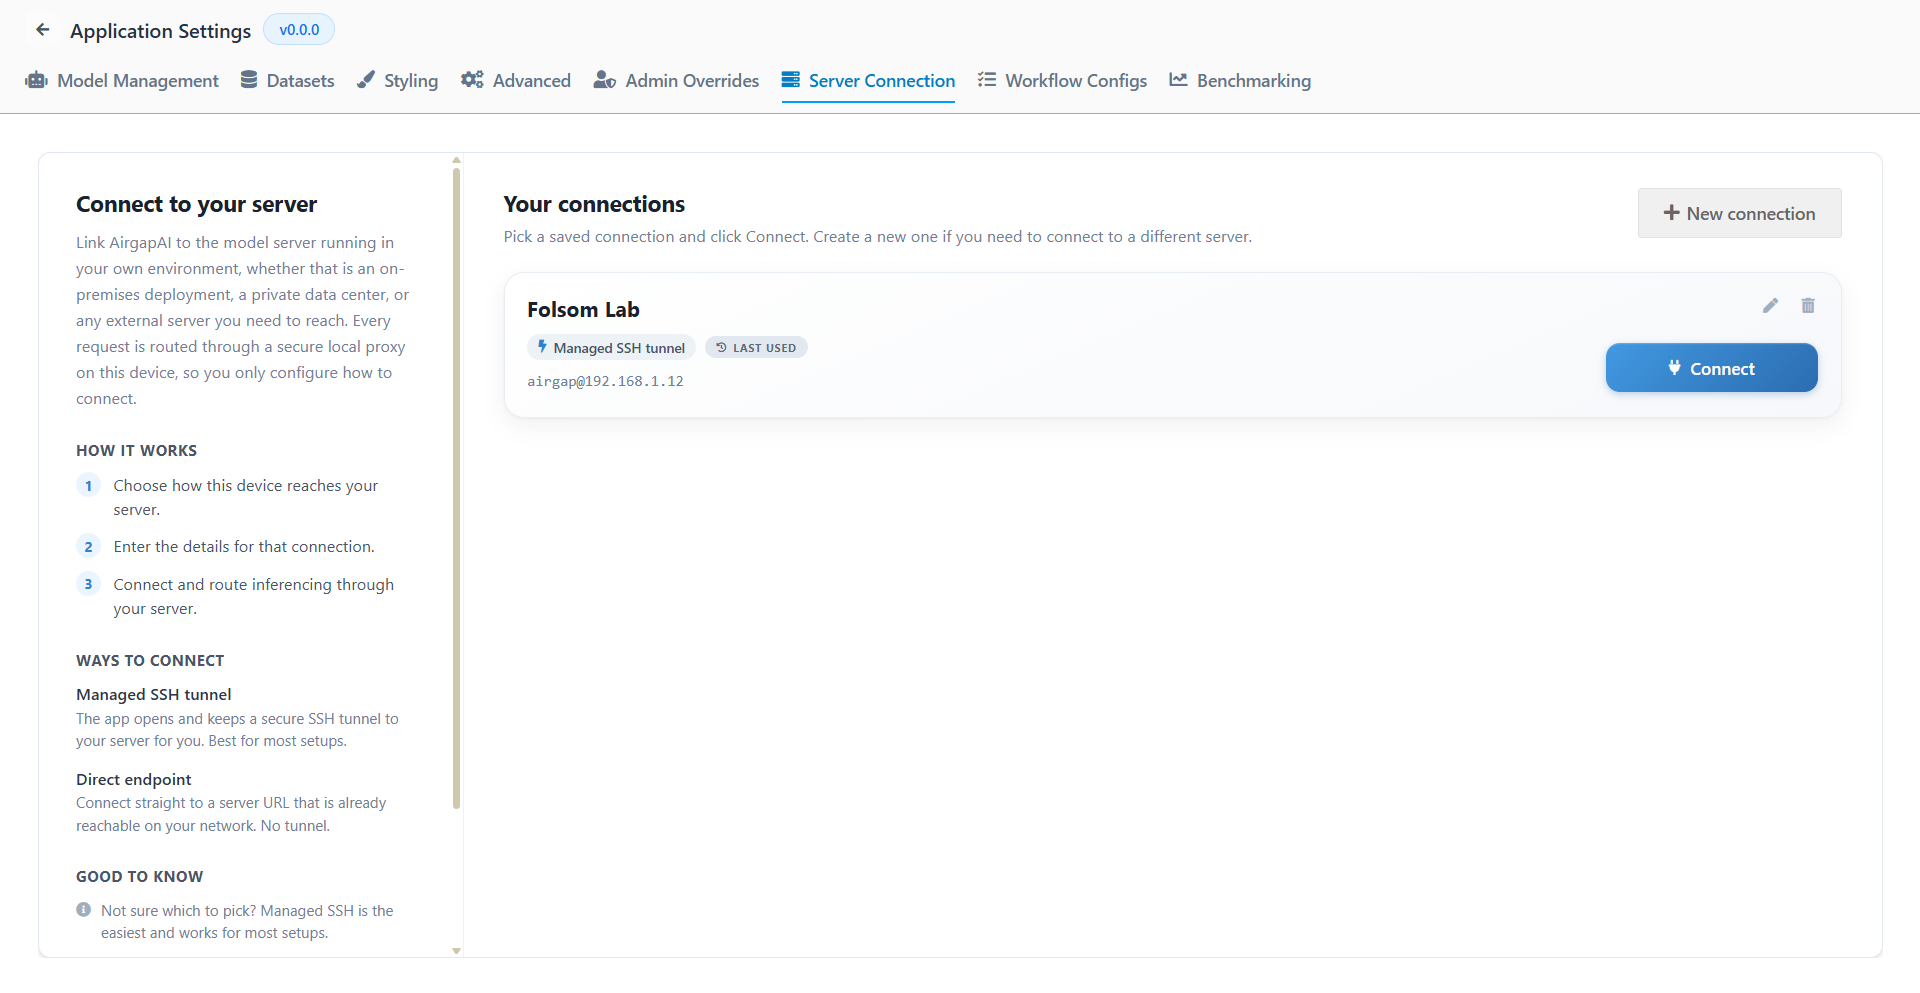
💡 Under the hood: "Routed through a secure local proxy on this device" means AirgapAI runs a small helper on your laptop and points it at your server — you only supply the address or login.
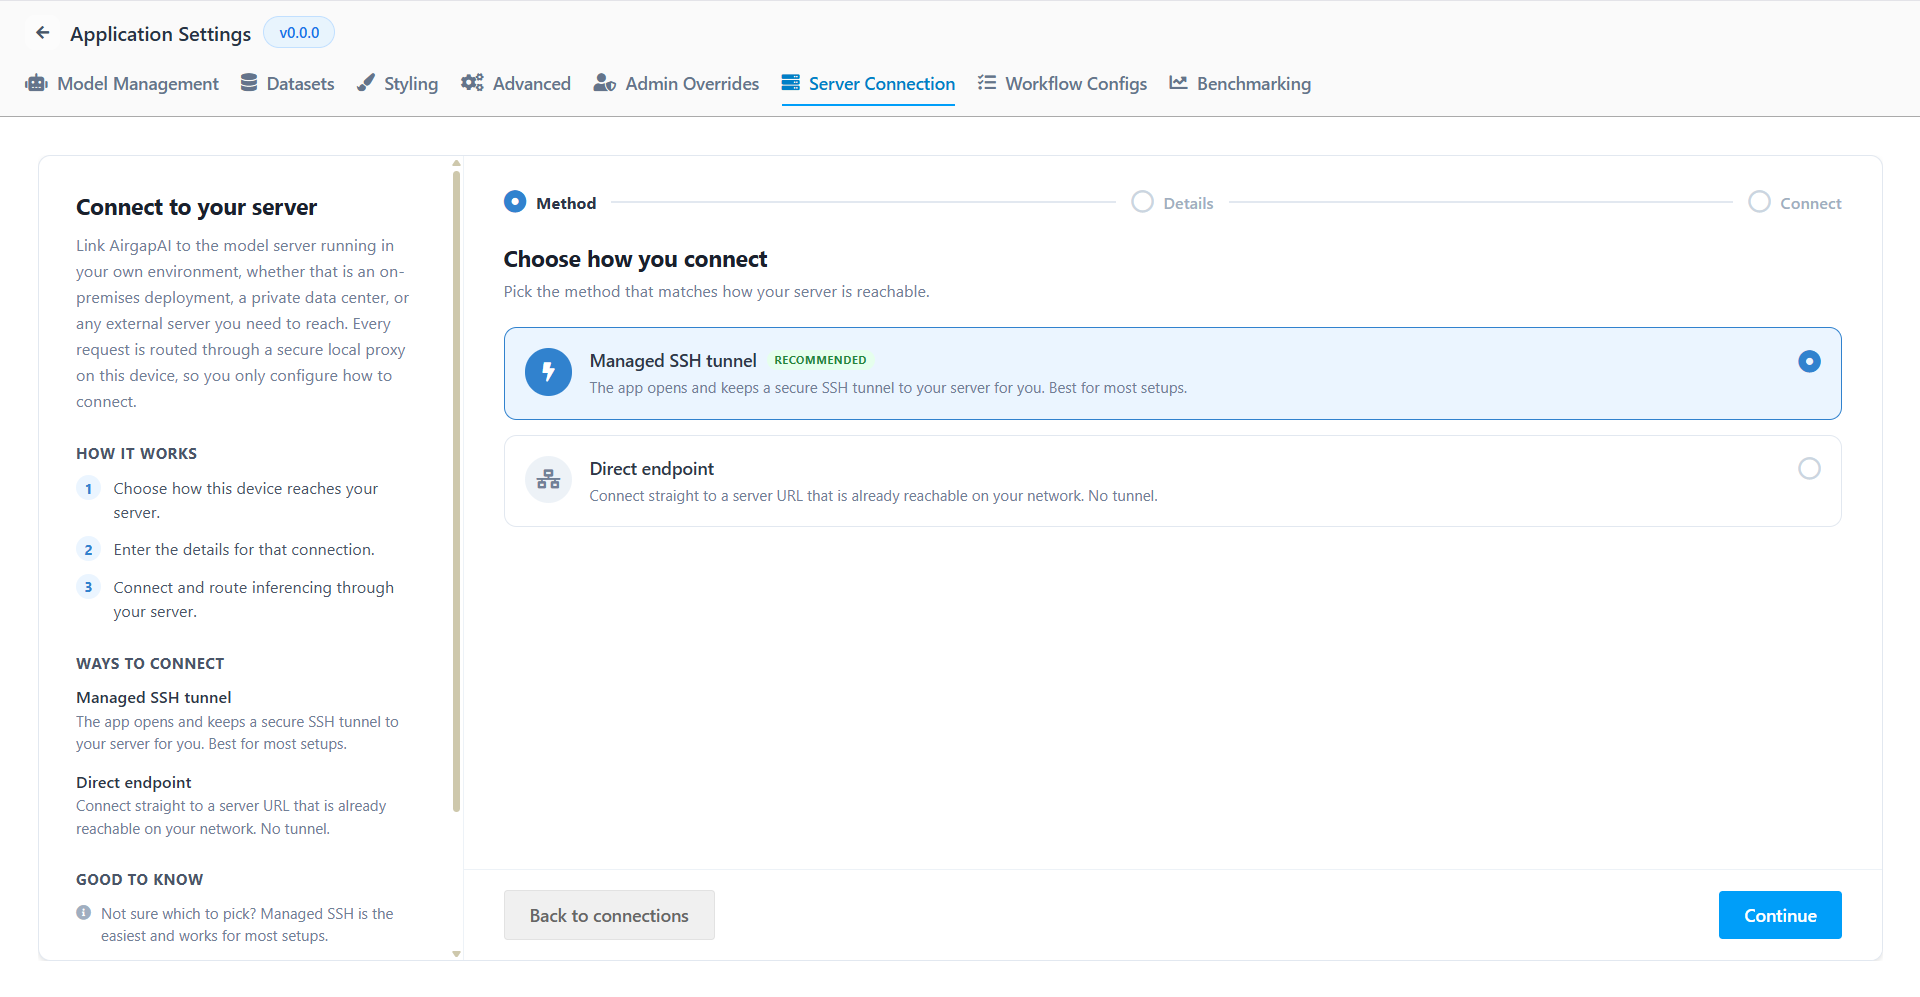
3. Pick your method
After New connection, a short wizard opens. The progress bar reads Method → Details → Connect. You are on Method.
- On "Choose how you connect," pick the option that matches Plan your connection:
- Managed SSH tunnel (Recommended) — "The app opens and keeps a secure SSH tunnel to your server for you."
- Choose this if IT gave you an SSH login.
- Direct endpoint — "Connect straight to a server URL that is already reachable on your network. No tunnel."
- Choose this if you have the server's web address and can already reach it.
- Managed SSH tunnel (Recommended) — "The app opens and keeps a secure SSH tunnel to your server for you."
- Click Continue.
4. Enter your connection details
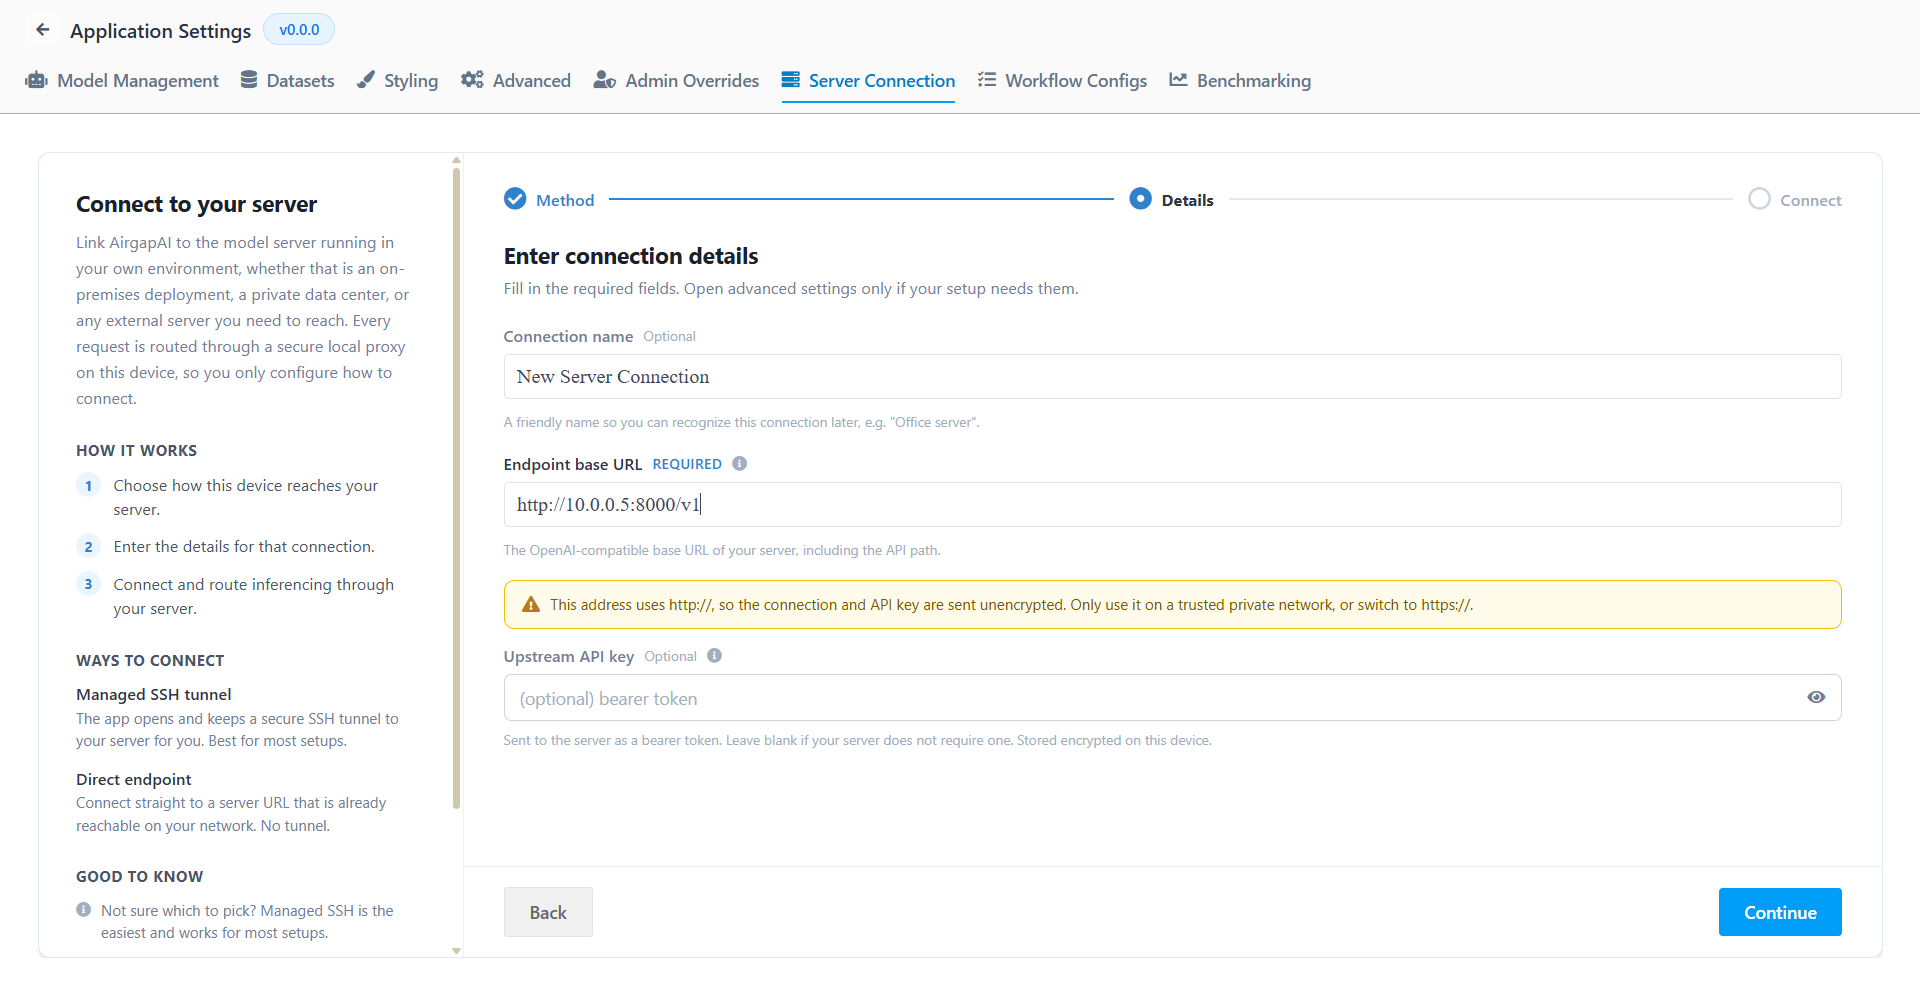
Enter the server information you gathered in Plan your connection for the method you chose. You may add an optional Connection name (e.g. Lab server) so the saved profile is easy to spot later; if you leave it blank, the app uses My Server. Open the Direct endpoint or Managed SSH tunnel section below that matches your setup, type the values IT gave you into each field, and click Continue when the form is complete.
Direct endpoint
- In Endpoint base URL, enter the full address IT gave you, including the port and
/v1.
Example:http://10.0.0.5:8000/v1 - (Optional) In Upstream API key, paste a key only if your server requires one.
- Click Continue.
- Include the port and
/v1in the URL exactly as IT provided — a wrong port is the most common connection failure. - If the address uses
http://(nothttps://), the app warns that traffic is unencrypted. On a trusted private network or VPN, that is expected.
Managed SSH tunnel
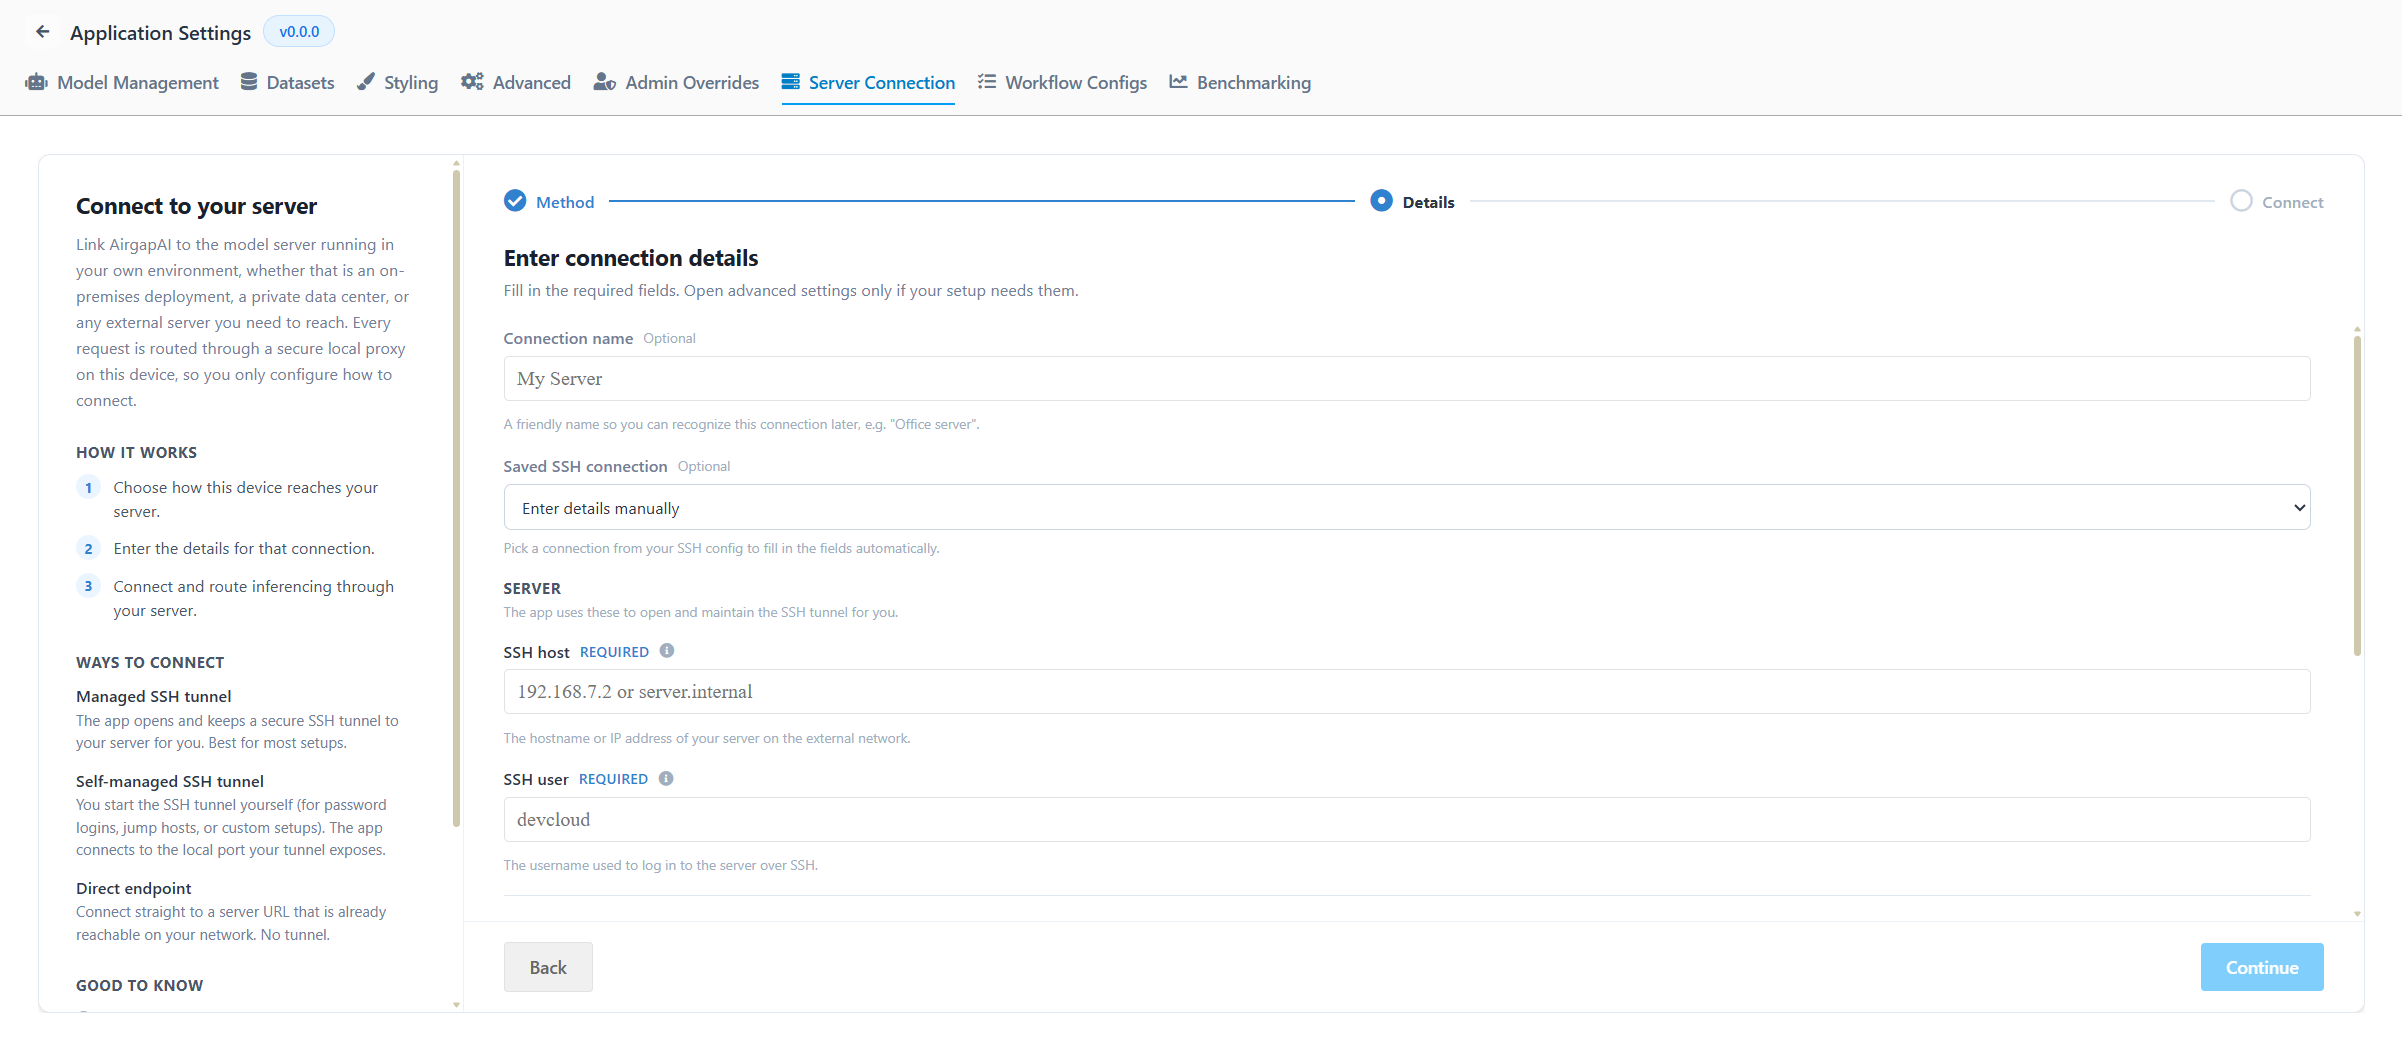
- In SSH host, enter the server address, e.g.
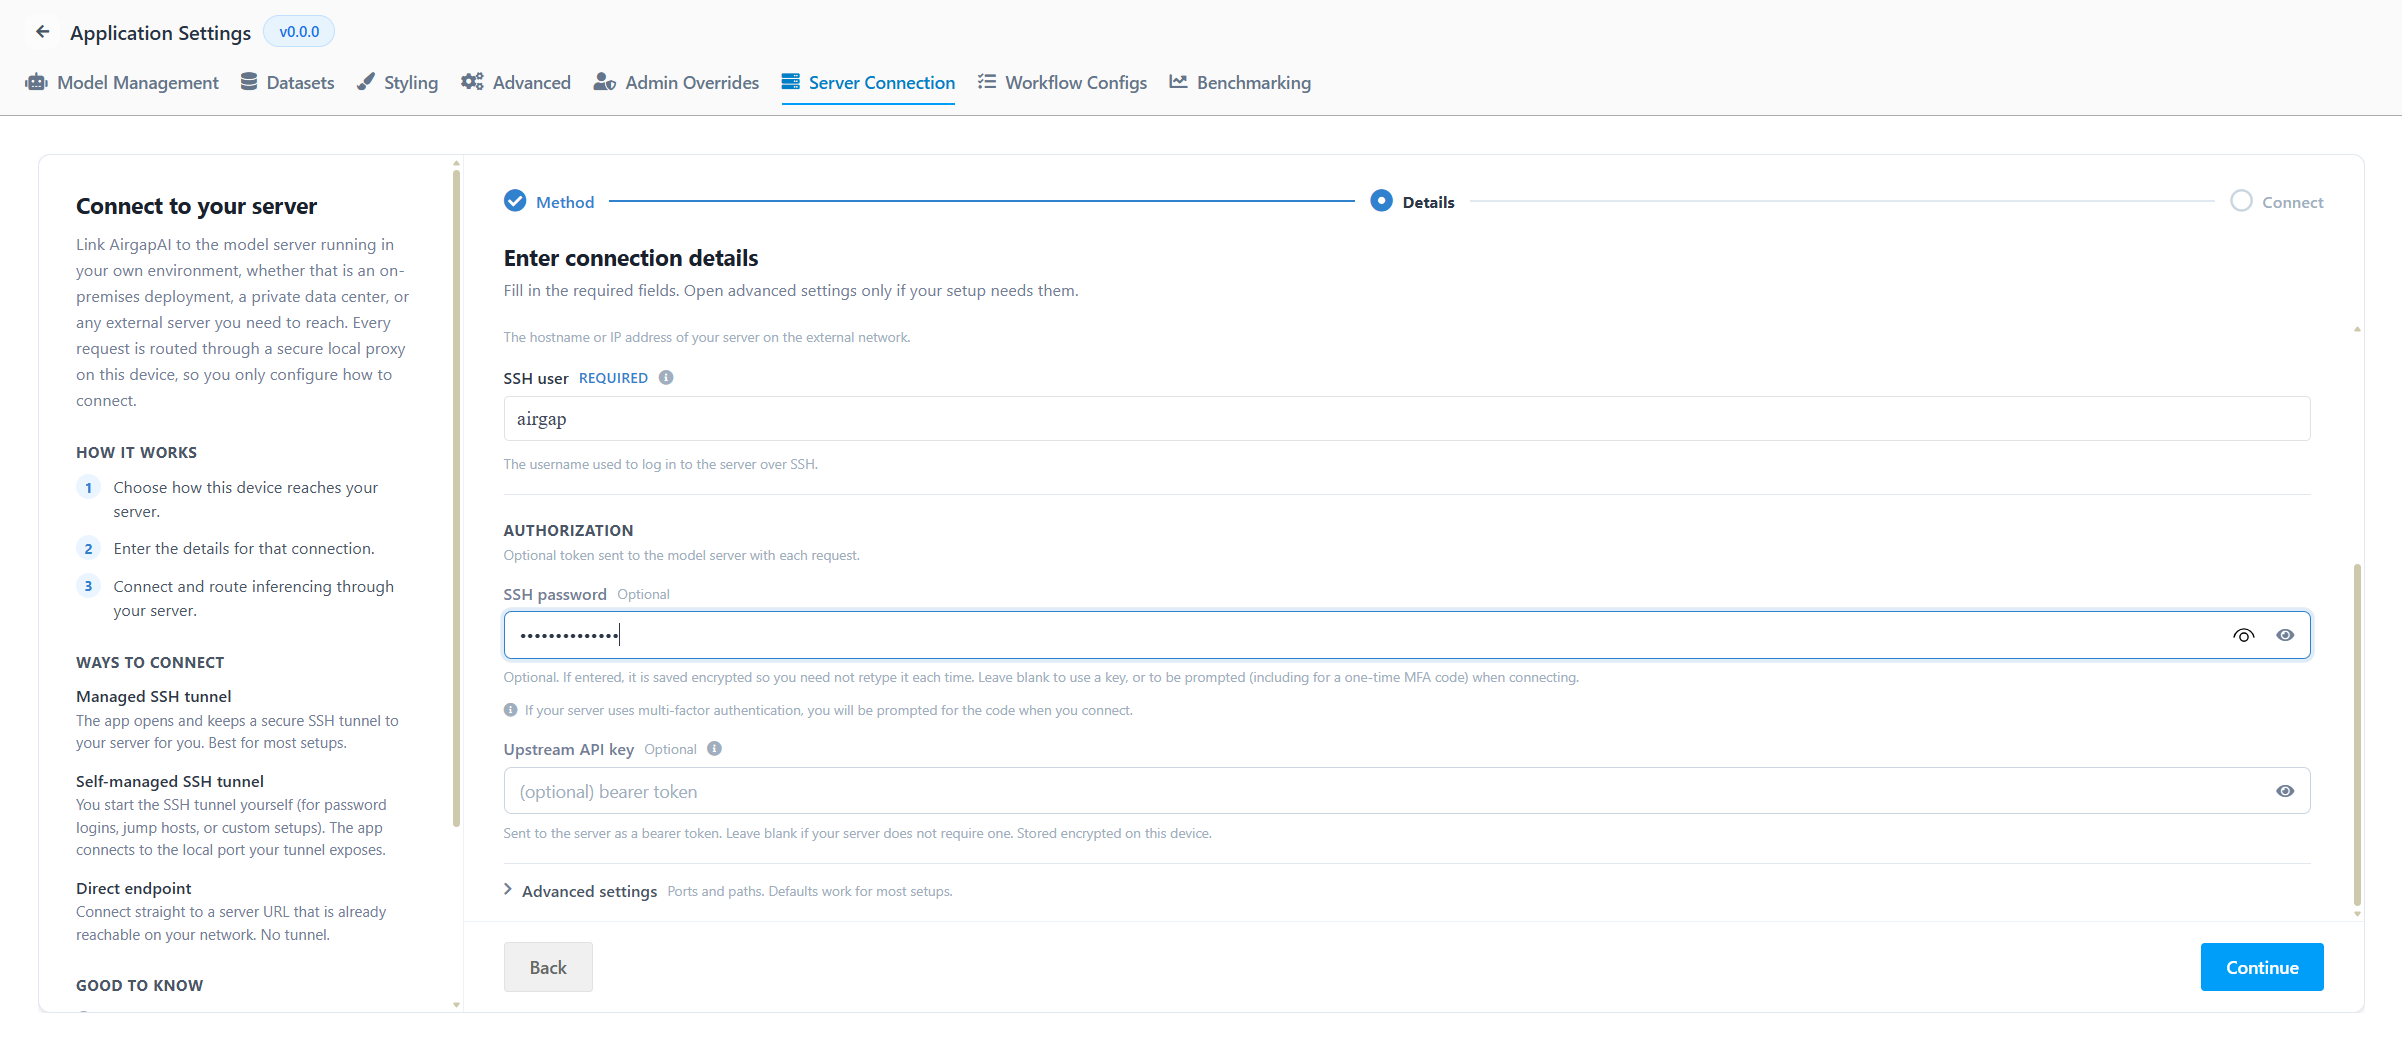
192.168.1.12. - In SSH user, enter the sign-in username, e.g.
airgap. - In SSH password, enter your password. Click Show SSH password to verify; AirgapAI stores it encrypted on this device.
- (Optional) In Upstream API key, paste a key only if your server requires one.
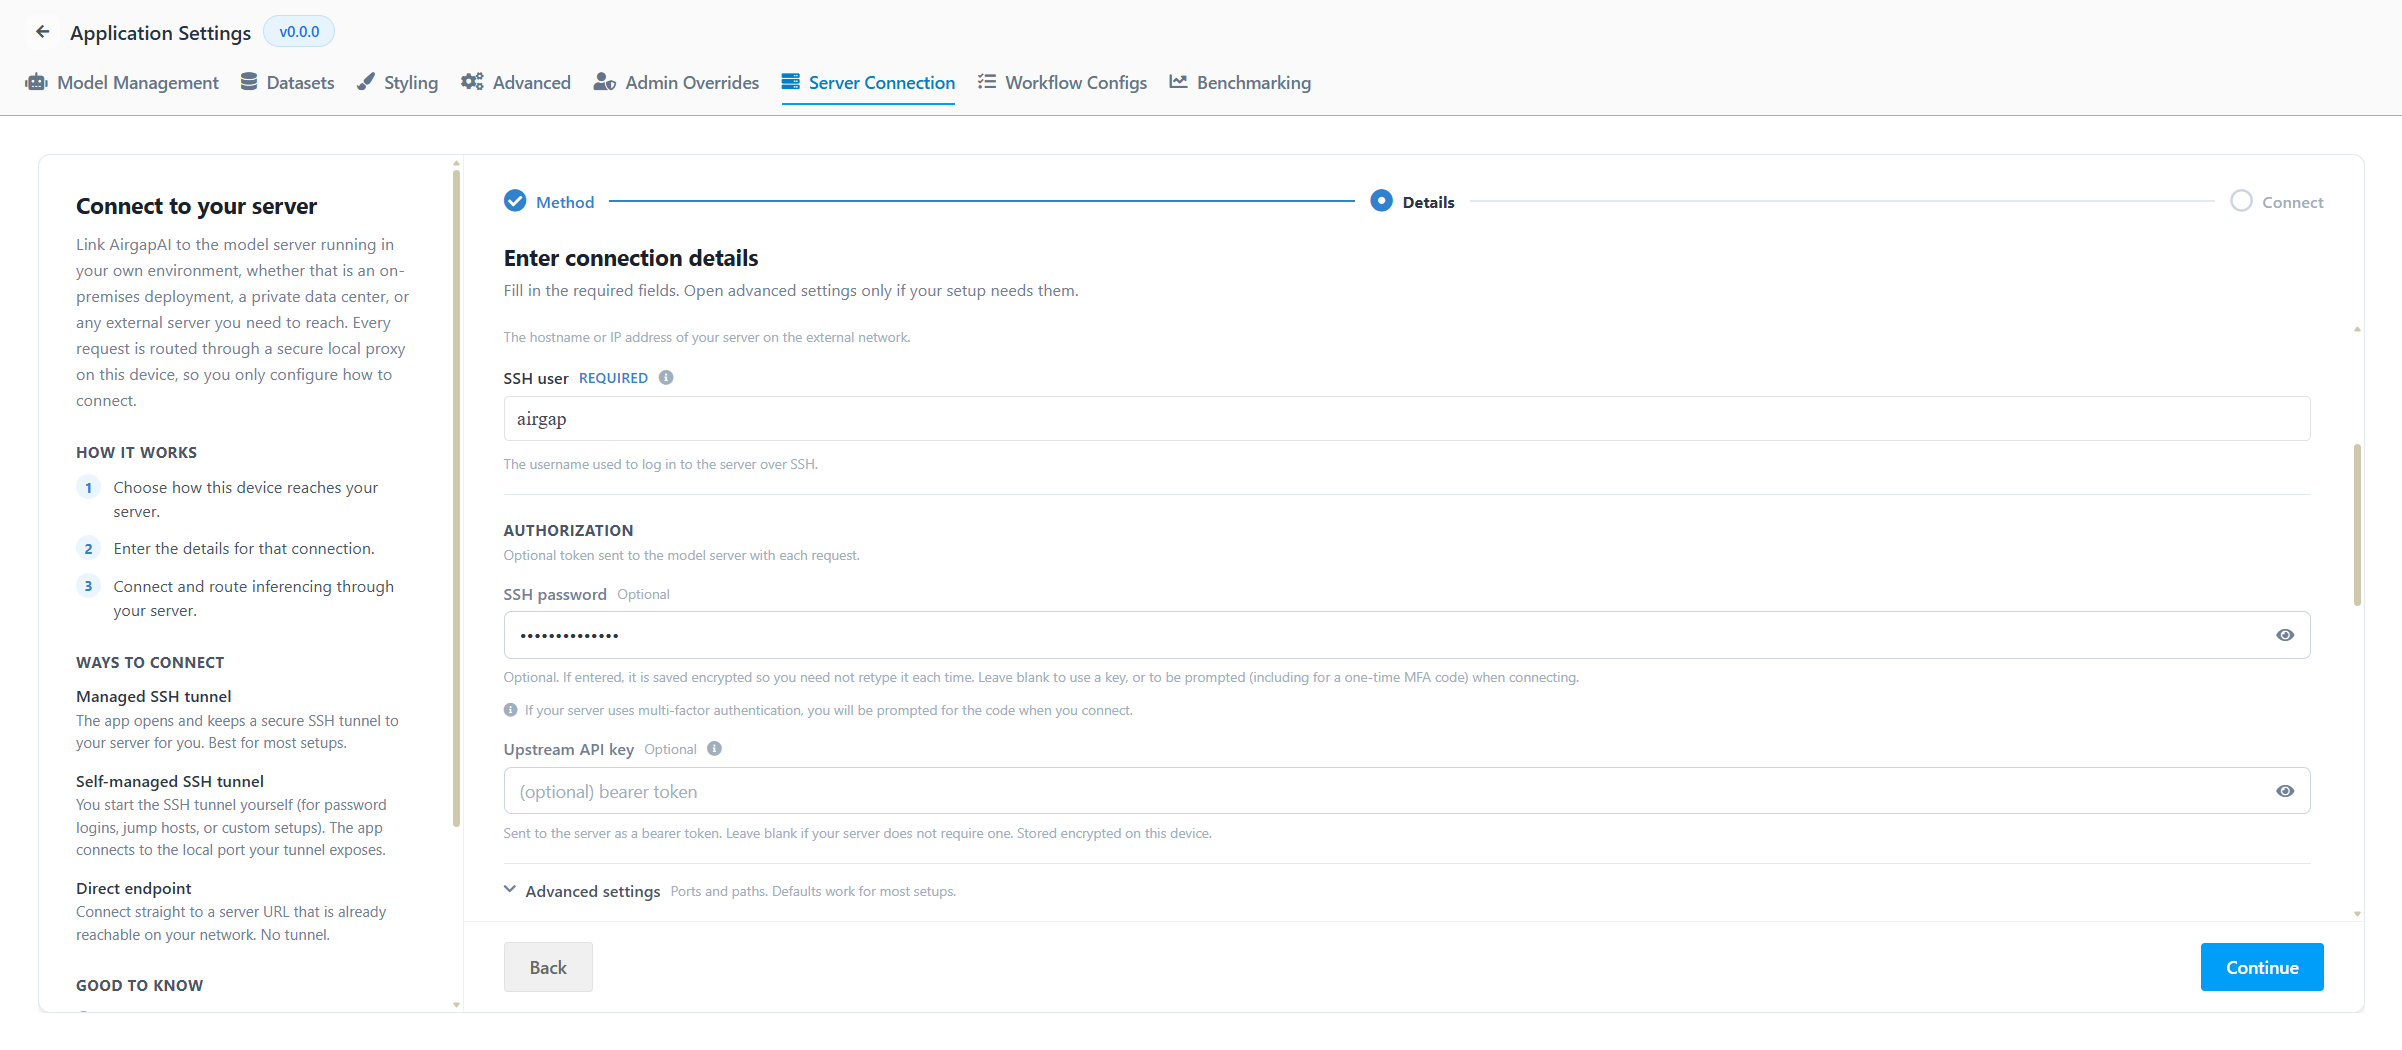
- Leave Advanced settings at their defaults (SSH port
22, remote and local port8000, API path/v1) unless IT gave you different values.
If your server uses MFA, AirgapAI prompts for a one-time code when you test or save the connection — that is normal.
- Click Continue. The button stays disabled until SSH host and SSH user are filled.
5. Review, test, and connect
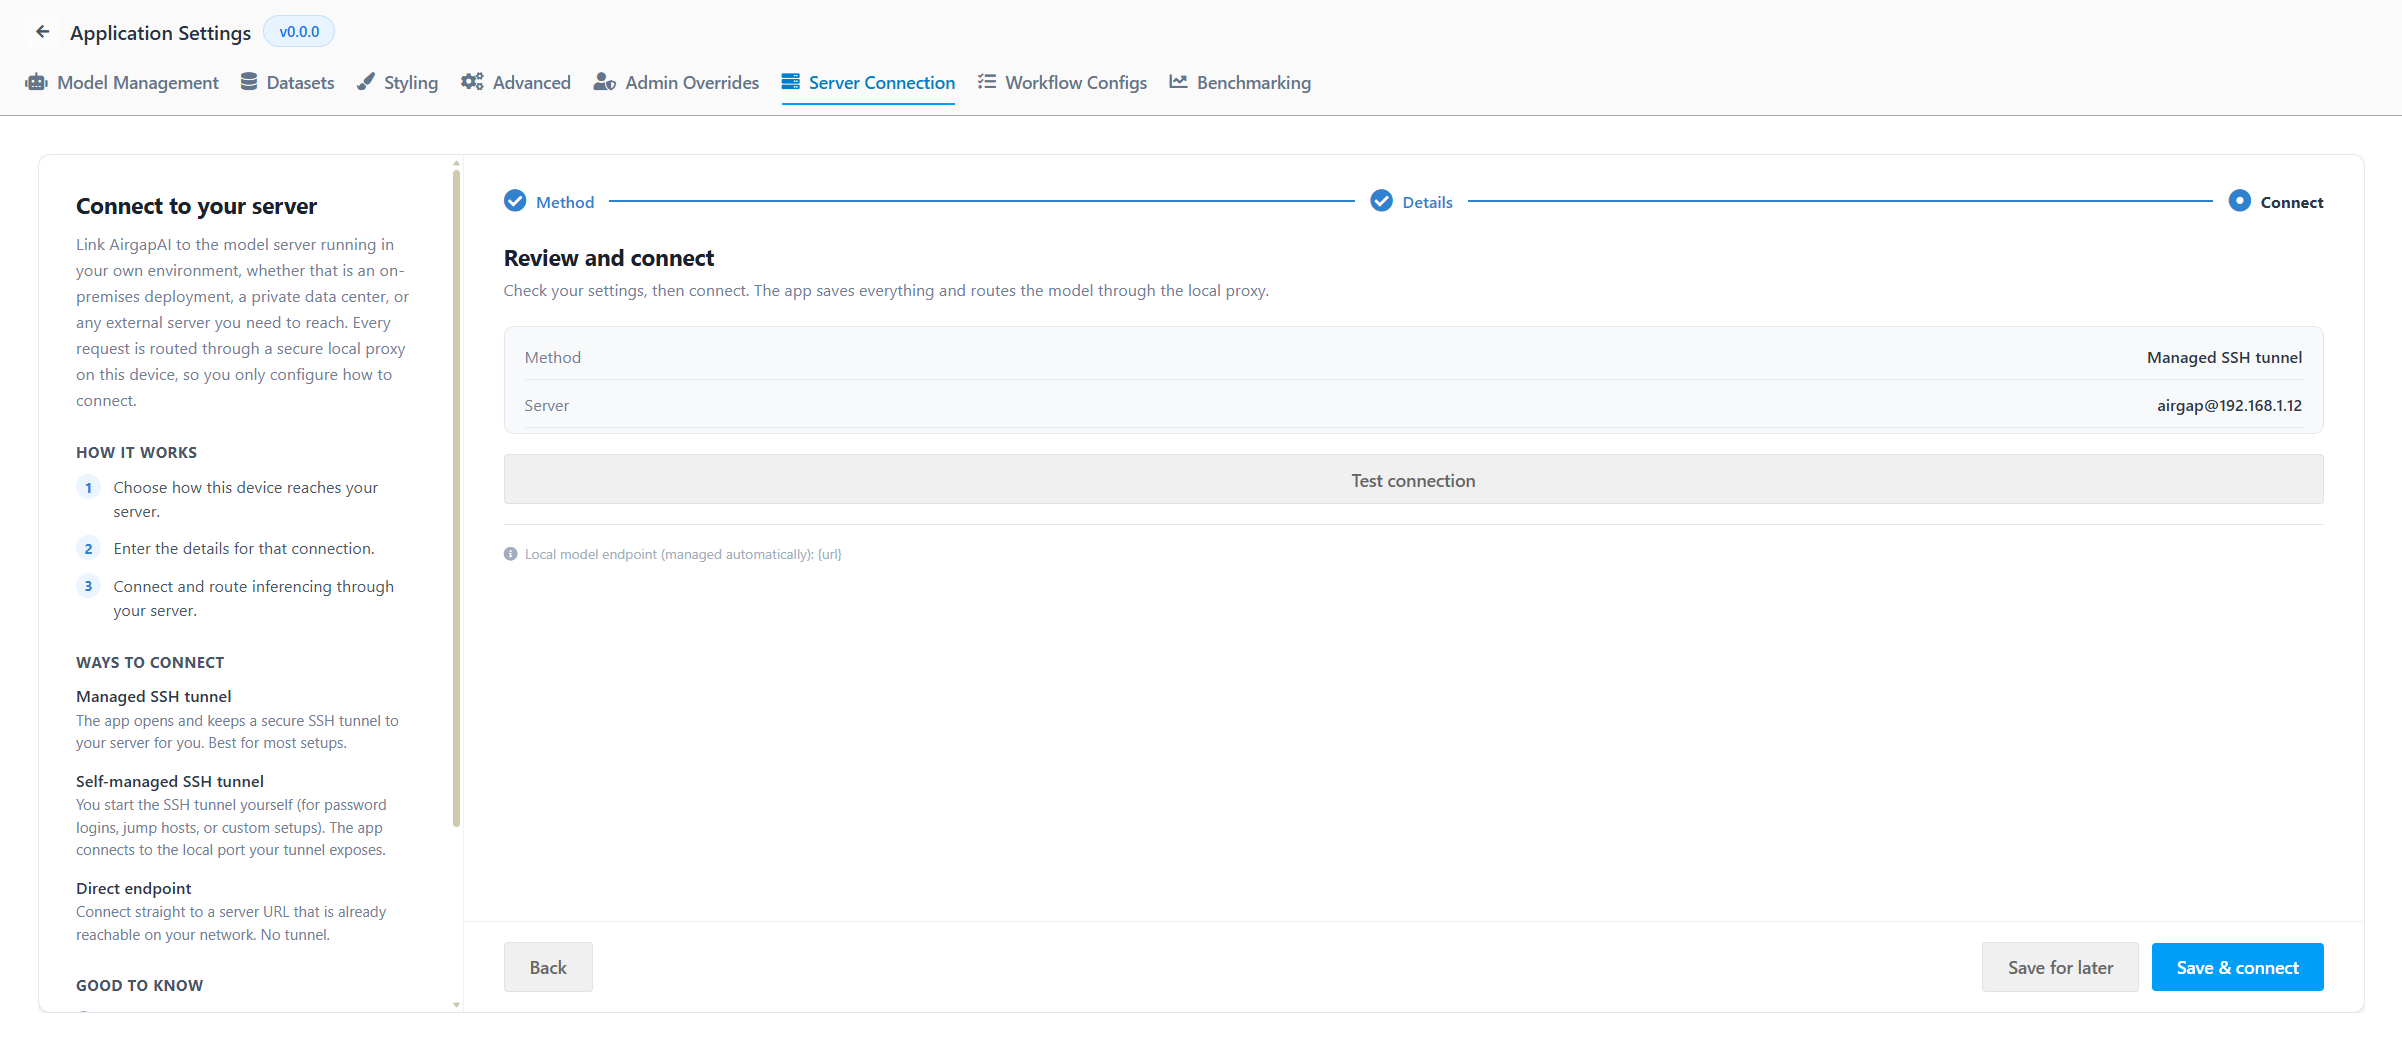
This is the final step—Review and connect. Confirm your details and proceed to connect.
- Check the summary — Method and Server should match what you entered.
- Click Test connection:
- ✅ "Reachable — the server answered the test." → continue to step 3.
- ❌ "The connection test failed." → see troubleshooting below.
- Click Save & connect (shows "Connecting…"). For SSH, enter a one-time MFA code if prompted.
- When it succeeds, you land on the connected dashboard: a Connected badge, health check, and Disconnect button will appear for that configuration.
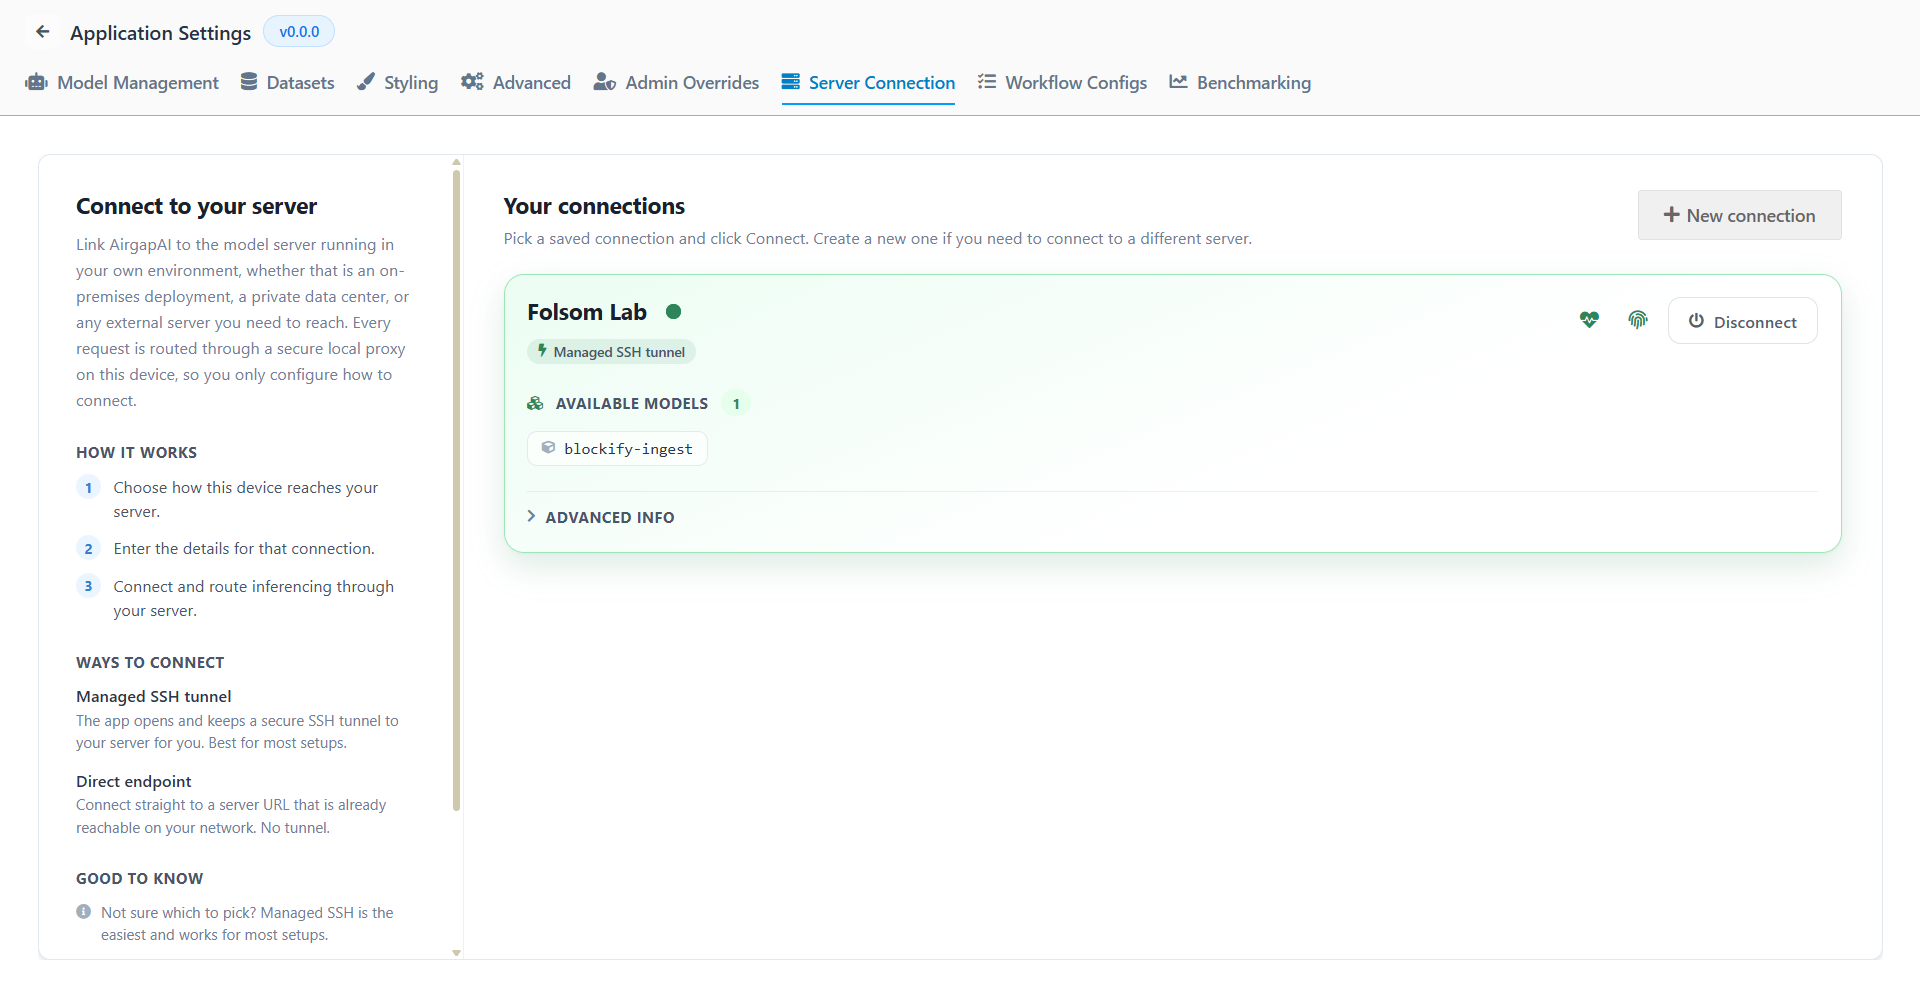
💾 Your connection is saved as a profile. Next time you do not re-type anything — see Using AirgapAI → reconnect. AirgapAI does not auto-reconnect on launch; you connect on purpose each session.
- "Test connection failed" / "connection refused": the VPN dropped (if you use one), the address or port is wrong, or the server is off. Re-check the VPN is green, re-check the address character-for-character, then ask your contact to confirm the server is running.
- "Sign-in failed" (SSH method): the SSH username or password is wrong — go Back and re-check (watch for trailing spaces / Caps Lock).
- "Unauthorized" / 401: the API key is missing or wrong — re-enter it.
- Connected but no server models listed: the server may still be loading — wait a moment and reopen the model list.
Using AirgapAI
Now that you have connected to the server, using AirgapAI involves four steps: set your model, send a chat, run a Blockify job, and reconnect your server when you start a new session.
Set your model
Your active model is chosen in Settings → Model Management:
- Open Settings (left sidebar, bottom-left) and select Model Management.
- Under Chat AI Model, pick the model AirgapAI should use. Your local (on-device) models and your server's models — both appear here. (Note: server models only appear once connected)
💡 Local vs server: a local model runs entirely on your laptop (works offline); a server model runs on your organization's server — bigger/specialized models without needing a powerful laptop.
Send a chat
- Open the New Chat view — it's the default home screen.
- Click the chat input area at the bottom, type your question — for example "What is AirgapAI?" — and press Enter to send.
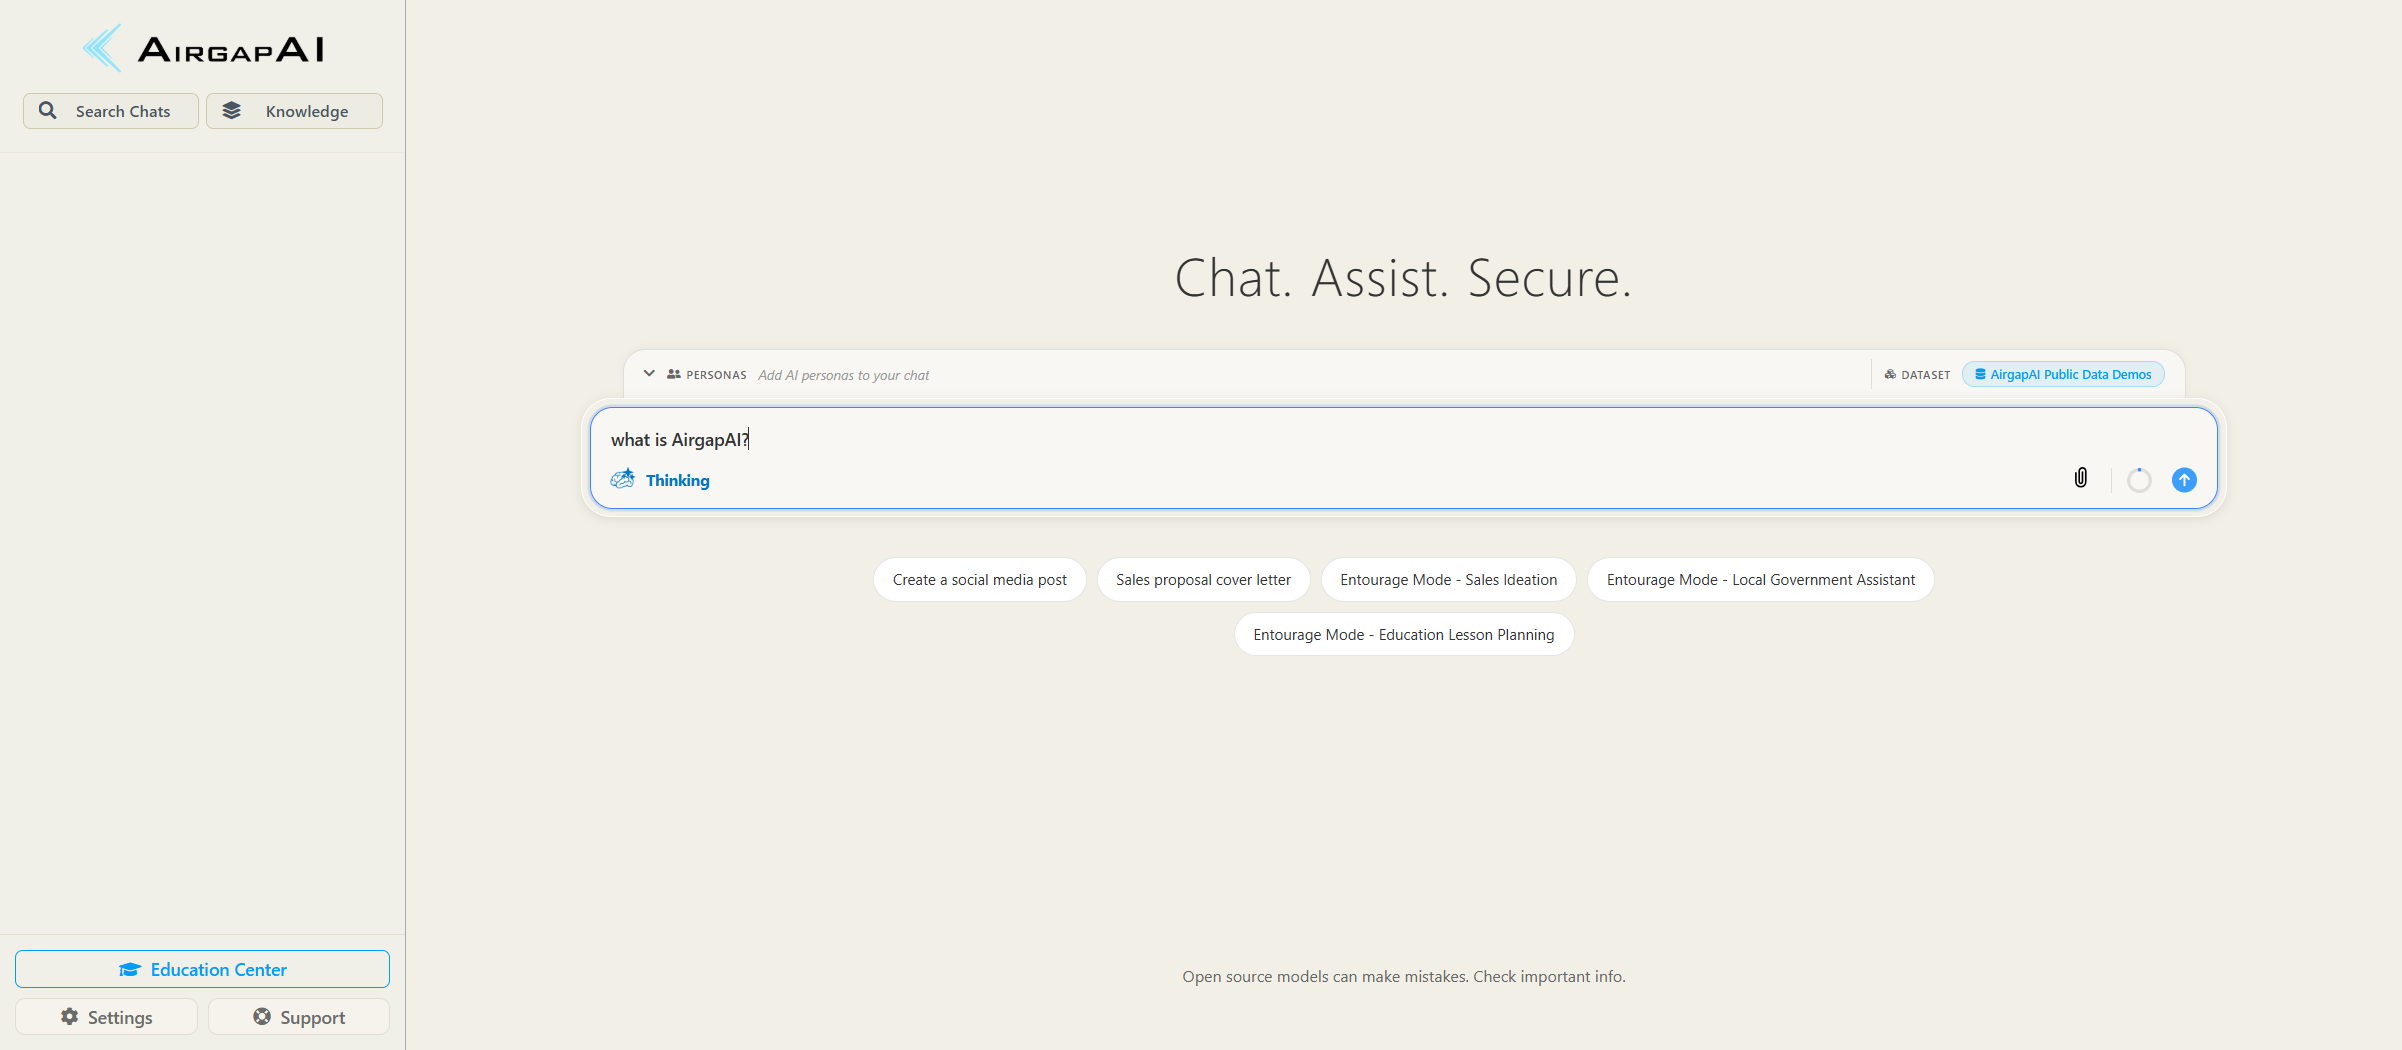
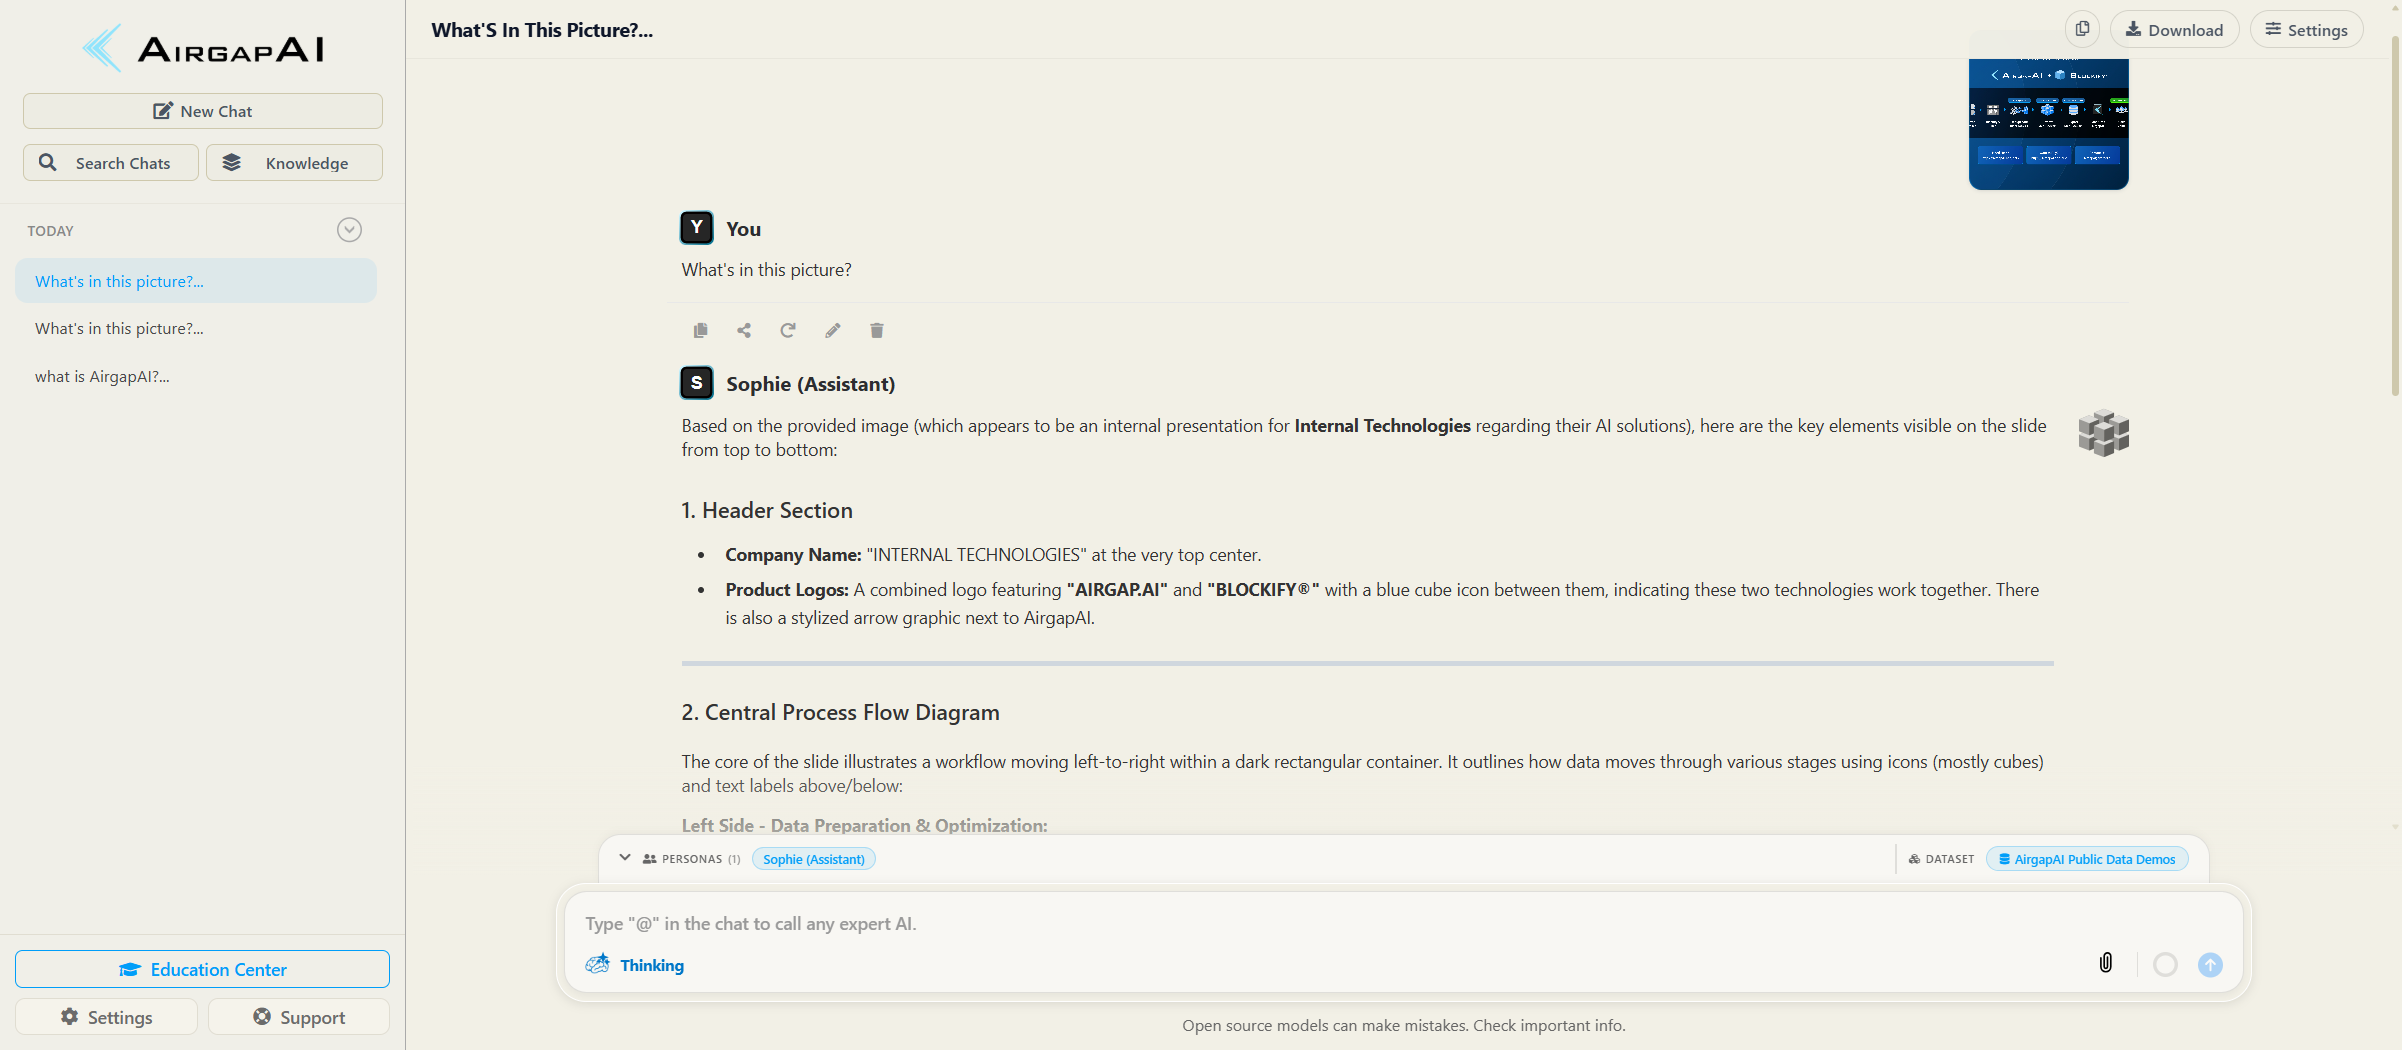
- Read the reply. If a dataset is active (here, AirgapAI Public Data Demos), the assistant grounds its answer in that content; expand Thought Process to see the model's reasoning. Start a new chat anytime from the sidebar, or keep asking follow-ups in the same one.
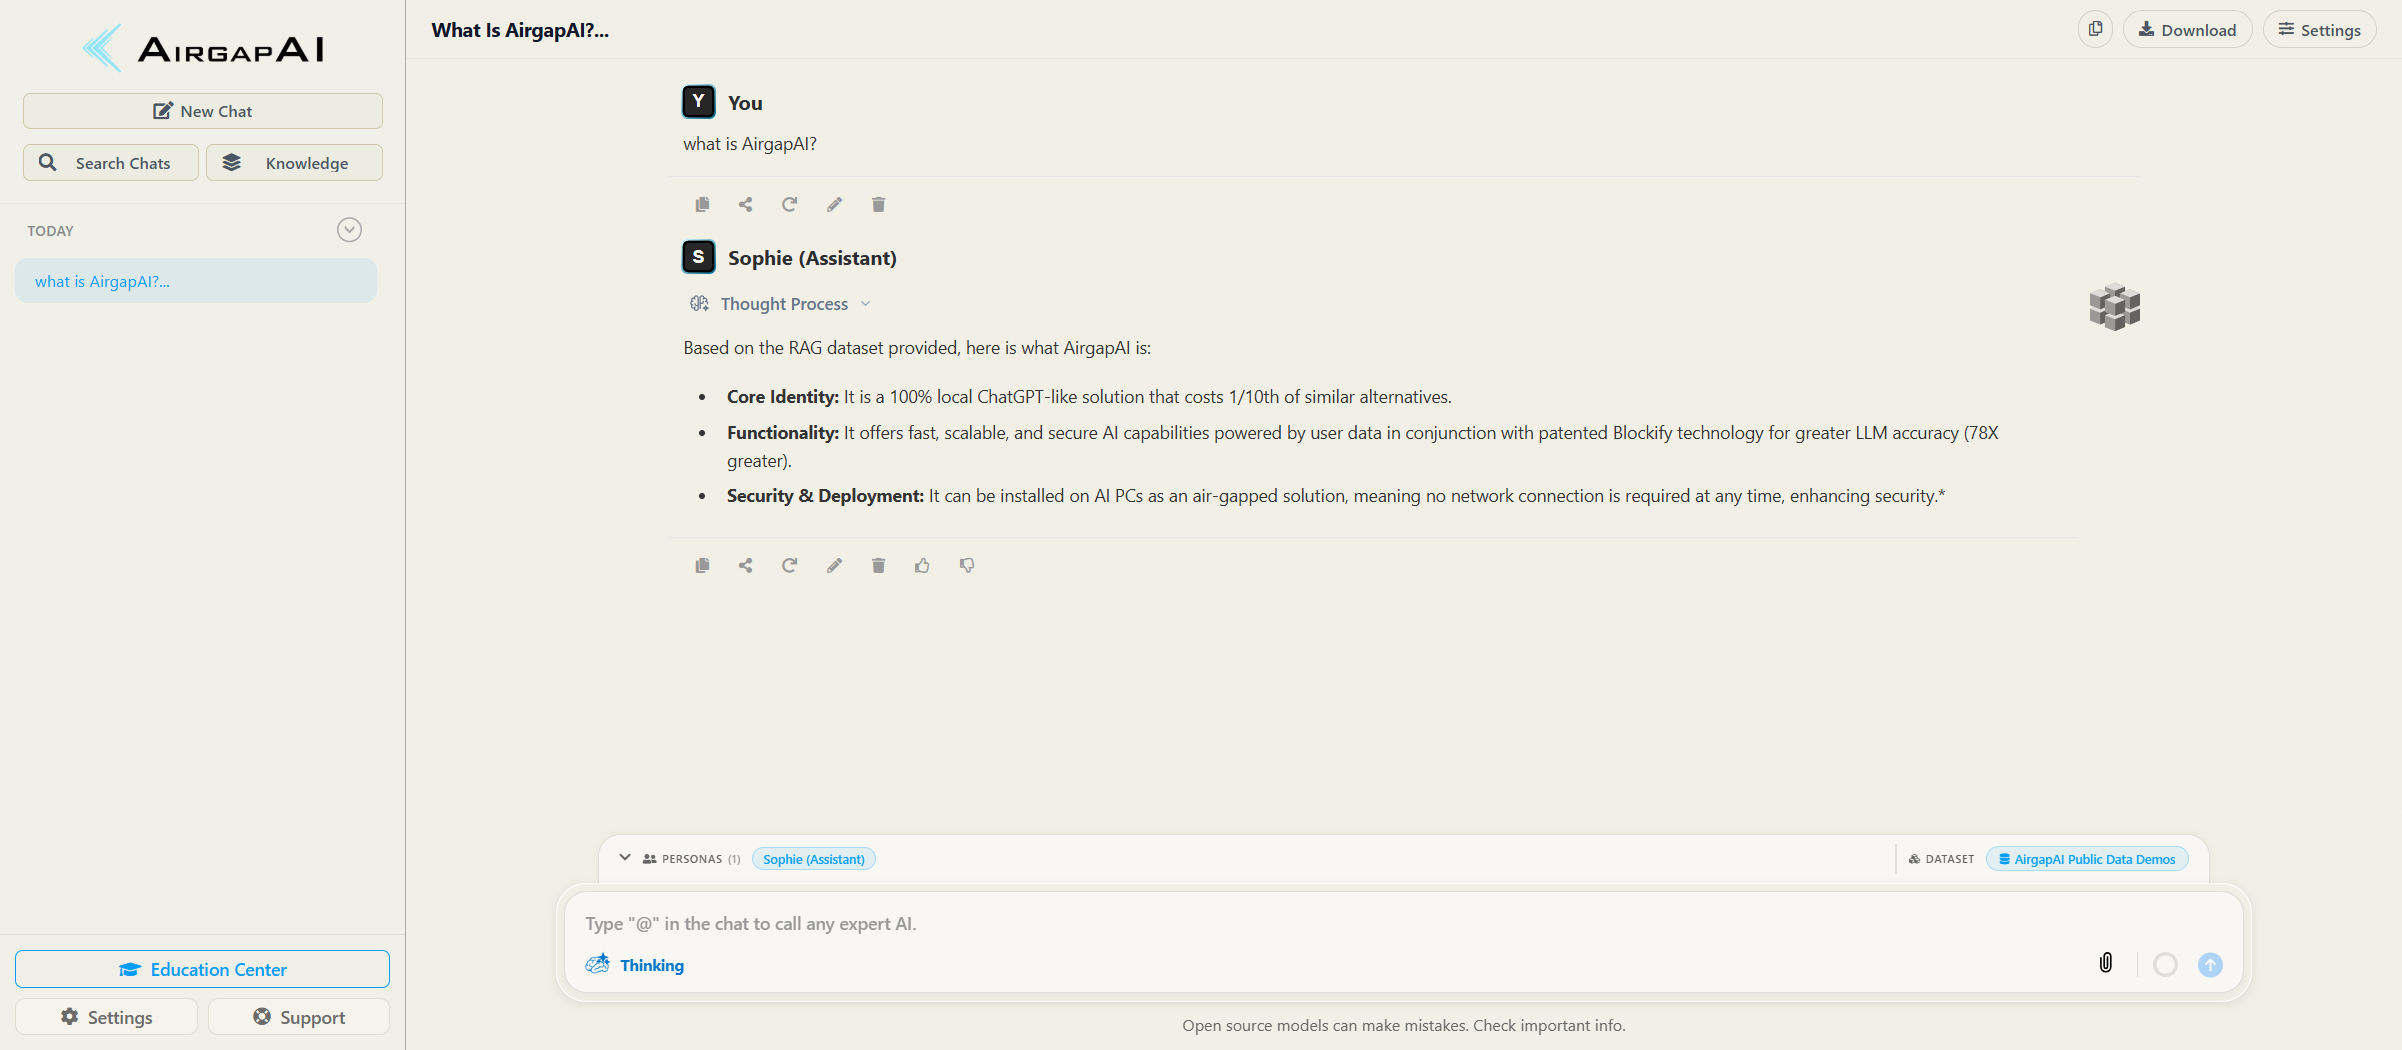
- Vision (optional): if your model offers a vision capability, click the attach (📎) control, add an image, type a question such as "What's in this picture?", and send. The model "sees" the image and describes it.
Run a Blockify job
Blockify turns your files into a searchable, citable knowledge base (called a corpus or dataset). Once a job finishes, chat can answer using — and citing — your content.
- From the left menu, open Blockify.
- Choose Blockify Documents Locally and click Blockify — the LLM-powered option for best quality. (Use Basic Chunking Locally only if no Blockify model is available yet.)
- On Job Information:
- Select Corpus → Create New Corpus
- New Corpus Name → a clear name you'll recognize later (e.g.
Project Docs) - Embedding Model → pick the embedding model that powers search (required)
- Upload your files — drag and drop into the upload area, or click to browse. Supported types include PDF, DOCX, DOC, TXT, MD, CSV, LOG, and ZIP (max 10 MB per file). Wait until each file shows as uploaded with no errors.
- Leave Advanced / Context Settings at their defaults for a first run, then click Blockify at the bottom.
- Watch the job progress screen until all stages complete: Text Extraction → Blockification → Embeddings → Corpus creation.
- Return to chat, open the dataset selector (corpus chooser) near the message box, turn on your new corpus, and ask a question about your documents. To switch back to normal chat, set the dataset selector to No Corpus.
💡 Server models for Blockify: a server Blockify model gives the highest-accuracy document ingestion — set it under Settings → Model Management before you run the job. (Full walkthrough: the Setup & Onboarding Guide.)
Reconnect your server
AirgapAI doesn't auto-reconnect to the server when you re-open the application. Each session is termianted on close, so the app stays local and offline by default. To pick up where you left off, just reconnect to your saved configuration (no re-typing):
- (If you use one) connect your VPN and wait for green.
- Open Settings → Server Connection.
- Under "Your connections," click Connect on your saved configuration.
Stuck on something? See References. 🔙 Back to the overview.
References
Help
Stuck or not sure where to go next? Start with the overview for the full path, or jump back to the section you need:
- Plan your connection — choose your method and whether you need a VPN.
- Connect to VPN — get on the company network (if required).
- Open Server Connection — connect AirgapAI to your server.
- Using AirgapAI — set your model, chat, Blockify, and reconnect your server.
For the full app walkthrough (including Blockify in depth), see the Setup & Onboarding Guide.
FAQ
Do I need a VPN? Only if your laptop isn't already on the server's network (for example, you're working remotely). See Plan your connection.
Direct endpoint or Managed SSH tunnel — which do I pick? Direct endpoint if you have a reachable web address; Managed SSH tunnel if you sign in to the server with an SSH login. See Plan your connection.
Does my data leave my device? Local models run entirely on your laptop — nothing leaves. Server models send your request to your organization's own server, not a third party.
Is http:// safe? On a trusted private network or VPN, yes. The unencrypted-traffic warning matters only on the open internet.
Where are my credentials stored? Encrypted, on your device only.
Why doesn't AirgapAI reconnect automatically? By design, you connect on purpose each session, so the app stays offline-by-default. See Using AirgapAI → Reconnect your server.
Troubleshooting
Test connection fails / "connection refused."
The VPN dropped (if you use one), the address/port is wrong, or the server is off. Confirm the VPN is green, re-check the address character-for-character, then ask your contact to confirm the server is running.
"Sign-in failed" (Managed SSH tunnel).
The SSH username or password is wrong. Go Back in the wizard and re-check them (watch for trailing spaces / Caps Lock).
"Unauthorized" / 401.
The API key is missing or wrong. Re-open the connection and re-enter it.
"Missing external certificate" (OpenVPN).
Your profile's certificate check is on but you have no certificate. Turn Require External Certificate off in the profile — see Connect to VPN. (Only add a certificate if your contact gave you one.)
Server models don't appear in the picker.
- Confirm you're still connected (and the VPN is on, if you use one).
- The server may still be loading models — wait a moment, then reopen the picker.
- Still nothing? Open Settings → Server Connection and check the connected dashboard's model list; if it's empty there too, contact your contact.
A literal {url} shows on the review screen.
Cosmetic only — a placeholder the app doesn't fill in. It doesn't affect the connection.
⬅️ Back to the overview.